springcloud教程第5篇:config-server配置
获取更多内容
获取更多内容请访问: https://juntech.top/
1、简介
在分布式系统中,由于服务数量巨多,为了方便服务配置文件统一管理,实时更新,所以需要分布式配置中心组件。在Spring Cloud中,有分布式配置中心组件spring cloud config ,它支持配置服务放在配置服务的内存中(即本地),也支持放在远程Git仓库中。在spring cloud config 组件中,分两个角色,一是config server,二是config client。
2、构建config server
创建一个spring-boot项目,取名为config-server
pom.xml:需引入eureka-client、spring cloud config server
        <dependency>
            <groupId>org.springframework.cloud</groupId>
            <artifactId>spring-cloud-config-server</artifactId>
        </dependency>

        <dependency>
            <groupId>org.springframework.boot</groupId>
            <artifactId>spring-boot-starter-test</artifactId>
            <scope>test</scope>
        </dependency>

        <dependency>
            <groupId>org.springframework.cloud</groupId>
            <artifactId>spring-cloud-starter-netflix-eureka-client</artifactId>
        </dependency>
在程序的入口Application类加上@EnableConfigServer注解开启配置服务器的功能,代码如下:
@SpringBootApplication
@EnableConfigServer
public class ConfigServerApplication {

    public static void main(String[] args) {
        SpringApplication.run(ConfigServerApplication.class, args);
    }
}
application.properties:
<<<<<<< HEAD
spring.application.name=config-server
server.port=8888


spring.cloud.config.server.git.uri=https://github.com/yourname/your repository/
spring.cloud.config.server.git.searchPaths=configRepo
spring.cloud.config.label=master
spring.cloud.config.server.git.username=your username
spring.cloud.config.server.git.password=your password
=======
#server.port= 8763
#spring.application.name= config-server
#
##配置中心
#spring.cloud.config.server.git.uri= https://github.com/JunTech/springcloud-config-repo
#spring.cloud.config.server.git.password=
#spring.cloud.config.server.git.username=
#spring.cloud.config.server.git.search-paths=config-repo
#spring.cloud.config.label=master
server:
  port: 8763
spring:
  application:
    name: config-server
  profiles:
    active: native
  cloud:
    config:
      server:
        native:
          search-locations: classpath:/configRepo
>>>>>>> 2019.08.27
- spring.cloud.config.server.git.uri:配置git仓库地址
- spring.cloud.config.server.git.searchPaths:配置仓库路径
- spring.cloud.config.label:配置仓库的分支
- spring.cloud.config.server.git.username:访问git仓库的用户名
- spring.cloud.config.server.git.password:访问git仓库的用户密码
如果Git仓库为公开仓库,可以不填写用户名和密码,如果是私有仓库需要填写.
<<<<<<< HEAD
没注释的是配置在本地环境的!!!
1、配置在git仓库
2019.08.27
远程仓库https://github.com/yourname/your repository/中创建文件config-client-dev.yml,文件中有一个属性:
author: juntech
启动程序:访问http://localhost:8888/author/dev
证明配置服务中心可以从远程程序获取配置信息。
http请求地址和资源文件映射如下:
- /{application}/{profile}[/{label}]
- /{application}-{profile}.yml
- /{label}/{application}-{profile}.yml
- /{application}-{profile}.properties
- /{label}/{application}-{profile}.properties
<<<<<<< HEAD
2、配置在本地
在applicaiton.*目录下创建configRepo文件夹,用于存放各个client的配置文件!
config-client-dev.yml:
author: juntech
server:
  port: 10007
2019.08.27
3、构建一个config client
重新创建一个springboot项目,取名为config-client,其pom文件:
        <dependency>
            <groupId>org.springframework.cloud</groupId>
            <artifactId>spring-cloud-starter-config</artifactId>
        </dependency>

        <dependency>
            <groupId>org.springframework.boot</groupId>
            <artifactId>spring-boot-starter-web</artifactId>
        </dependency>

        <dependency>
            <groupId>org.springframework.boot</groupId>
            <artifactId>spring-boot-starter-test</artifactId>
            <scope>test</scope>
        </dependency>
<<<<<<< HEAD
applciation.properties:
spring.application.name=config-client
spring.cloud.config.label=master
spring.cloud.config.profile=dev #profile
spring.cloud.config.uri= http://localhost:8888/ #配置中心uri
server.port=8881 #自身port
=======
bootstrap.yml: (注意,每个client的配置文件都必须是bootstrap.yml(properties),不然会报错,各位可以试试)
```yml
#spring.application.name= config-client
#server.port= 10007
#
#spring.cloud.config.profile= dev
##指明配置服务中心的网址
#spring.cloud.config.uri = http://localhost:8763
#spring.cloud.config.label=master
spring:
application:
name: config-client
profiles:
active: dev
cloud:
config:
uri: http://localhost:8763
eureka:
client:
service-url:
default-zone: http://localhost:8761/eureka/
>>>>>>> 2019.08.27
-
spring.cloud.config.label 指明远程仓库的分支
-
spring.cloud.config.profile
- dev开发环境配置文件
- test测试环境
- pro正式环境
<<<<<<< HEAD
-
spring.cloud.config.uri= http://localhost:8888/ 指明配置服务中心的网址。
-
spring.cloud.config.uri= http://localhost:8763/ 指明配置服务中心的网址。
2019.08.27
- 读取的是配置中心的 config-client-dev.yml或properties
程序的入口类,写一个API接口“/hi”,返回从配置中心读取的author变量的值,代码如下:
<<<<<<< HEAD
@SpringBootApplication
@RestController
public class ConfigClientApplication {

    public static void main(String[] args) {
        SpringApplication.run(ConfigClientApplication.class, args);
    }

    @Value("${author}")
    private String author;
    @RequestMapping(value = "/hi")
    public String hi(){
        return foo;
    }
}
打开网址访问:http://localhost:8881/hi,网页显示:
juntech
package top.juntech.springcloudconfigclient;
import org.springframework.beans.factory.annotation.Value;
import org.springframework.boot.SpringApplication;
import org.springframework.boot.autoconfigure.SpringBootApplication;
import org.springframework.cloud.client.discovery.EnableDiscoveryClient;
import org.springframework.web.bind.annotation.GetMapping;
import org.springframework.web.bind.annotation.RestController;
@SpringBootApplication
@RestController
@EnableDiscoveryClient
public class SpringcloudConfigClientApplication {
public static void main(String[] args) {
    SpringApplication.run(SpringcloudConfigClientApplication.class, args);
}

@Value("${author}")
private String author;

@Value("${server.port}")
private String port;

@GetMapping("/hi")
public String hi(){
    return "hi ,author : "+this.author+",i am from port : "+this.port;
}
}
打开网址访问:http://localhost:10007/hi,网页显示:
> hi ,author : juntech,i am from port : 10007
>>>>>>> 2019.08.27
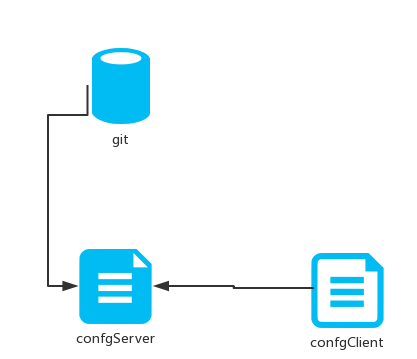
这就说明,config-client从config-server获取了foo的属性,而config-server是从git仓库读取的,如图:
## 4、参考资料
- [config-server](https://projects.spring.io/spring-cloud/spring-cloud.html#_spring_cloud_config)
更多详情
设置为vip可见的都可访问下面链接地址,即可观看原文
更多详情请访问: juntech


