Quartz2D 编程指南(三)渐变、透明层 、数据管理
- Quartz2D 编程指南(一)概览、图形上下文、路径、颜色与颜色空间
- Quartz2D 编程指南(二)变换、图案、阴影
- Quartz2D 编程指南(三)渐变、透明层 、数据管理
- Quartz2D 编程指南(四)位图与图像遮罩、CoreGraphics 绘制 Layer
- 概览
- 图形上下文
- 路径
- 颜色与颜色空间
- 变换
- 图案
- 阴影
- 渐变
- 透明层
- Quartz 2D 中的数据管理
- 位图与图像遮罩
- CoreGraphics 绘制 Layer
渐变
简介
-
渐变是从一个颜色到另外一种颜色的填充
-
Quartz 提供了 CGShadingRef 和 CGGradientRef 来创建轴向或径向渐变。
-
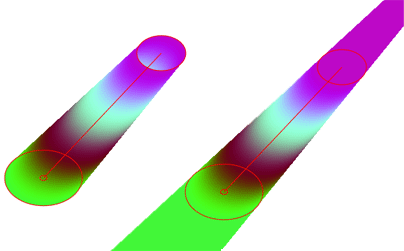
轴向渐变(也称为线性渐变)沿着由两个端点连接的轴线渐变。所有位于垂直于轴线的某条线上的点都具有相同的颜色值。
-
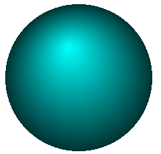
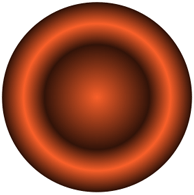
径向渐变也是沿着两个端点连接的轴线渐变,不过路径通常由两个圆来定义。
效果展示
CGShading 和 CGGradient 对象的对比
- CGGradient 是 CGShading 的子集,他提供了更高级的 API,更易于使用。而 CGShading 使用户有更高的控制权,可以定义更加复杂的渐变。
| CGGradient | CGShading |
|---|---|
| 可以使用相同的 CGGradient 创建轴向和径向渐变 | 需要使用不同的 CGShading 创建轴向和径向渐变 |
| CGGradient 的几何形状(轴向或径向)是在 Quartz 绘制时指定的 | CGShading 的几何形状(轴向或径向)是在创建时指定的 |
| Quartz 来计算渐变梯度上每个点对应的颜色值 | 你必须提供使用 CGFunctionRef 提供回调函数来计算渐变梯度上每个点对应的颜色值 |
| 可以轻松的定义多个定位点和颜色 | 需要设计我们自己的回调函数来定义多个定位点和颜色,因此更多的工作需要我们手动处理 |
扩展渐变端点外部的颜色
- 我们可以扩展渐变起点和终点两端的颜色。

使用 CGGradient 绘制径向和轴向渐变
-
CGGradient 是渐变的抽象定义,它简单地指定了颜色值和位置,但没有指定几何形状。我们可以在轴向和径向几何形状中使用它。
-
因为Quartz为我们计算渐变,使用 CGGradient 创建和绘制渐变便更加直接,只需要以下步骤。
- 创建一个 CGGradient 对象,提供一个颜色空间,一个饱含两个或更多颜色组件的数组,一个包含两个或多个位置的数组,和两个数组中元素的个数。
- 调用 CGContextDrawLinearGradient 或 CGContextDrawRadialGradient 函数并提供一个上下文、一个 CGGradient 对象、绘制选项和开始结束几何图形来绘制渐变。
- 当不再需要时释放CGGradient对象。
- (void)drawRect:(CGRect)rect {
    [super drawRect:rect];
    CGContextRef context = UIGraphicsGetCurrentContext();
    CGRect clip = CGRectInset(CGContextGetClipBoundingBox(context), 20.0, 20.0);
    CGContextClipToRect(context, clip);

    CGFloat locations[2] = {0.0, 1.0};
    CGFloat components[8] = {1.0, 0.5, 0.4, 1.0,  // Start color
                             0.8, 0.8, 0.3, 1.0}; // End color
    CGColorSpaceRef myColorspace = CGColorSpaceCreateDeviceRGB();
    CGGradientRef myGradient = CGGradientCreateWithColorComponents(myColorspace,
                                                                   components,
                                                                   locations,
                                                                   sizeof(components)/sizeof(components[0]));

    //绘制轴向渐变
    CGPoint myStartPoint = CGPointMake(CGRectGetMinX(clip), CGRectGetMinY(clip));
    CGPoint myEndPoint = CGPointMake(CGRectGetMinX(clip), CGRectGetMaxY(clip));
    CGContextDrawLinearGradient(context, myGradient, myStartPoint, myEndPoint, 0);

//    //绘制径向渐变
//    CGPoint myStartPoint = CGPointMake(50, 50);
//    CGPoint myEndPoint = CGPointMake(200, 200);
//    CGFloat myStartRadius = 20, myEndRadius = 100;
//    CGContextDrawRadialGradient (context, myGradient, myStartPoint,
//                                 myStartRadius, myEndPoint, myEndRadius,
//                                 kCGGradientDrawsAfterEndLocation);

}
- 最低限度情况下,Quartz 使用两个位置值。如果我们传递 NULL 值作为位置数组参数,则Quartz 使用 0 作为第一个位置,1 作为第二个位置。
CGFloat locations[2] = {0.0, 1.0};
CGGradientRef myGradient = CGGradientCreateWithColorComponents(myColorspace,
                                                               components,
                                                               NULL, // 相当于 {0.0, 1.0}
                                                               sizeof(components)/sizeof(components[0]));
- 可以使用如下方法创建
CGPoint myStartPoint = CGPointMake(50, 50);
CGPoint myEndPoint = CGPointMake(200, 200);
CGFloat myStartRadius = 20, myEndRadius = 100;
CGContextDrawRadialGradient (context, myGradient, myStartPoint,
                             myStartRadius, myEndPoint, myEndRadius,
                             kCGGradientDrawsBeforeStartLocation);
使用 CGShading 绘制轴向渐变
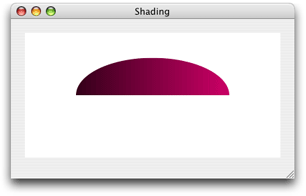
- 绘制上图轴向渐变需要如下步骤。
- 设置 CGFunction 对象来计算颜色值
- 创建轴向渐变的 CGShading 对象
- 裁减上下文
- 使用 CGShading 对象来绘制轴向渐变
- 释放对象
1.设置 CGFunction 对象来计算颜色值
- 回调的函数指针需要遵循如下格式。
typedef void (*CGFunctionEvaluateCallback)(void * __nullable info, const CGFloat * in, CGFloat * out);
- void *info:这个值可以为 NULL 或者是一个指向传递给 CGShading 创建函数的数据。
- const CGFloat *in:Quartz 传递 in 数组给回调。数组中的值必须在 CGFunction 对象定义的输入值范围内。
- CGFloat *out:我们的回调函数传递 out 数组给 Quartz。它包含用于颜色空间中每个颜色组件的元素及一个 alpha 值。输出值应该在 CGFunction 对象定义的输出值范围内。
static void myCalculateShadingValues(void *info, const CGFloat *in, CGFloat *out) {
    CGFloat v;
    size_t k, components;
    static const CGFloat c[] = {1, 0, .5, 0};
    components = (size_t)info;
    v = *in;
    for(k = 0; k < components -1; k++)
        *out++ = c[k] * v;
    *out = 1;
}
- 在写完计算颜色值的回调后,我们将其打包到 CGFunction 对象中。
static CGFunctionRef myGetFunction (CGColorSpaceRef colorspace) {
    static const CGFloat input_value_range[2] = {0, 1};
    static const CGFloat output_value_ranges[8] = {0, 1, 0, 1, 0, 1, 0, 1};
    static const CGFunctionCallbacks callbacks = {0, &myCalculateShadingValues, NULL};
    size_t  numComponents = 1 + CGColorSpaceGetNumberOfComponents (colorspace);
    return CGFunctionCreate((void *)numComponents,
                            1, input_value_range,
                            numComponents, output_value_ranges,
                            &callbacks);
}
2.创建轴向渐变的 CGShading 对象
- 调用 CGShadingCreateAxial 创建 CGShading 对象。
CGPoint startPoint = CGPointMake(50, 100);
CGPoint endPoint = CGPointMake(300, 100);
CGColorSpaceRef colorspace = CGColorSpaceCreateDeviceRGB();
CGFunctionRef myFunctionObject = myGetFunction(colorspace);
CGShadingRef myShading = CGShadingCreateAxial(colorspace,
                                              startPoint, endPoint,
                                              myFunctionObject,
                                              false, false);
3.裁减上下文
CGContextAddArc(context, 175, 175, 100, M_PI, 0, 0);
CGContextClosePath(context);
CGContextClip(context);
4.使用 CGShading 对象来绘制轴向渐变
CGContextDrawShading(context, myShading);
5.释放对象
CGShadingRelease (myShading);
CGColorSpaceRelease (colorspace);
CGFunctionRelease (myFunctionObject);
完整示例
void myPaintAxialShading(CGContextRef myContext, CGRect bounds) {
    CGPoint startPoint, endPoint;
    CGAffineTransform myTransform;
    CGFloat width = bounds.size.width;
    CGFloat height = bounds.size.height;

    startPoint = CGPointMake(0,0.5);
    endPoint = CGPointMake(1,0.5);

    CGColorSpaceRef colorspace = CGColorSpaceCreateDeviceRGB();
    CGFunctionRef myShadingFunction = myGetFunction(colorspace);

    CGShadingRef shading = CGShadingCreateAxial(colorspace,
                                                startPoint, endPoint,
                                                myShadingFunction,
                                                false, false);

    myTransform = CGAffineTransformMakeScale(width, height);
    CGContextConcatCTM(myContext, myTransform);
    CGContextSaveGState(myContext);

    CGContextClipToRect(myContext, CGRectMake(0, 0, 1, 1));
    CGContextSetRGBFillColor(myContext, 1, 1, 1, 1);
    CGContextFillRect(myContext, CGRectMake(0, 0, 1, 1));

    CGContextBeginPath(myContext);
    CGContextAddArc(myContext, .5, .5, .3, 0, M_PI, 0);
    CGContextClosePath(myContext);
    CGContextClip(myContext);

    CGContextDrawShading(myContext, shading);
    CGColorSpaceRelease(colorspace);
    CGShadingRelease(shading);
    CGFunctionRelease(myShadingFunction);

    CGContextRestoreGState(myContext);
}
使用 CGShading 绘制径向渐变
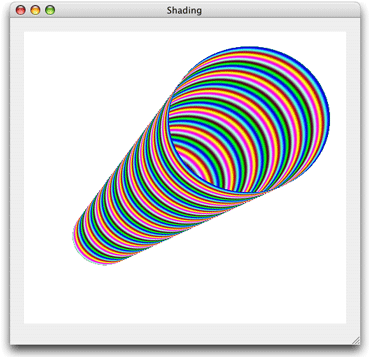
- 绘制上图径向渐变需要如下步骤。
- 设置 CGFunction 对象来计算颜色值
- 创建径向渐变的 CGShading 对象
- 使用 CGShading 对象来绘制径向渐变
- 释放对象
- 使用 CGShading 绘制径向渐变与绘制轴向渐变的过程类似,只是在创建 CGShading 时使用函数 CGShadingCreateRadial 而不是 CGShadingCreateAxial。
1.设置 CGFunction 对象来计算颜色值
static void  myCalculateShadingValues(void *info, const CGFloat *in, CGFloat *out) {
    size_t k, components;
    double frequency[4] = {55, 220, 110, 0};
    components = (size_t)info;
    for(k = 0; k < components - 1; k++)
        *out++ = (1 + sin(*in * frequency[k])) / 2;
    *out = 1;
}

static CGFunctionRef myGetFunction(CGColorSpaceRef colorspace) {
    static const CGFloat input_value_range[2] = {0, 1};
    static const CGFloat output_value_ranges[8] = {0, 1, 0, 1, 0, 1, 0, 1};
    static const CGFunctionCallbacks callbacks = {0, &myCalculateShadingValues, NULL};
    size_t numComponents = 1 + CGColorSpaceGetNumberOfComponents(colorspace);
    return CGFunctionCreate((void *)numComponents,
                            1, input_value_range,
                            numComponents, output_value_ranges,
                            &callbacks);
}
2.创建径向渐变的 CGShading 对象
CGPoint startPoint = CGPointMake(50, 50);
CGPoint endPoint = CGPointMake(250, 250);
CGFloat startRadius = 20;
CGFloat endRadius = 100;
CGColorSpaceRef colorspace = CGColorSpaceCreateDeviceRGB();
CGFunctionRef myShadingFunction = myGetFunction(colorspace);
CGShadingRef myShading = CGShadingCreateRadial(colorspace,
                                               startPoint,
                                               startRadius,
                                               endPoint,
                                               endRadius,
                                               myShadingFunction,
                                               false,
                                               false);
3.使用 CGShading 对象来绘制径向渐变
CGContextDrawShading(context, myShading);
4.释放对象
CGShadingRelease(myShading);
CGColorSpaceRelease(colorspace);
CGFunctionRelease(myShadingFunction);
完整示例
void myPaintRadialShading(CGContextRef myContext, CGRect bounds) {
    CGPoint startPoint,
    endPoint;
    CGFloat startRadius,
    endRadius;
    CGAffineTransform myTransform;
    CGFloat width = bounds.size.width;
    CGFloat height = bounds.size.height;

    startPoint = CGPointMake(0.25,0.3);
    startRadius = .1;
    endPoint = CGPointMake(.7,0.7);
    endRadius = .25;

    CGColorSpaceRef colorspace = CGColorSpaceCreateDeviceRGB();
    CGFunctionRef myShadingFunction = myGetFunction(colorspace);

    CGShadingRef shading = CGShadingCreateRadial(colorspace,
                                                 startPoint, startRadius,
                                                 endPoint, endRadius,
                                                 myShadingFunction,
                                                 false, false);

    myTransform = CGAffineTransformMakeScale(width, height);
    CGContextConcatCTM(myContext, myTransform);
    CGContextSaveGState(myContext);

    CGContextClipToRect(myContext, CGRectMake(0, 0, 1, 1));
    CGContextSetRGBFillColor(myContext, 1, 1, 1, 1);
    CGContextFillRect(myContext, CGRectMake(0, 0, 1, 1));

    CGContextDrawShading(myContext, shading);
    CGColorSpaceRelease(colorspace);
    CGShadingRelease(shading);
    CGFunctionRelease(myShadingFunction);

    CGContextRestoreGState(myContext);
}
透明层
- 透明层通过组合两个或多个对象来生成一个组合图形。组合图形被看成是单一对象。
-
Quartz 的透明层的概念类似于许多流行的图形应用中的层。
-
在透明层中进行绘制需要如下步骤。
- 调用函数 CGContextBeginTransparencyLayer
- 在透明层中绘制需要组合的对象
- 调用函数 CGContextEndTransparencyLayer
- (void)drawRect:(CGRect)rect {
    [super drawRect:rect];
    CGContextRef context = UIGraphicsGetCurrentContext();
    CGContextSetShadow(context, CGSizeMake(10, -20), 10);

    CGContextBeginTransparencyLayer(context, NULL);

    CGFloat wd = 300;
    CGFloat ht = 300;
    CGContextSetRGBFillColor(context, 0, 1, 0, 1);
    CGContextFillRect(context, CGRectMake (wd/3 + 50, ht/2, wd/4, ht/4));
    CGContextSetRGBFillColor(context, 0, 0, 1, 1);
    CGContextFillRect(context, CGRectMake (wd/3 - 50, ht/2 - 100, wd/4, ht/4));
    CGContextSetRGBFillColor(context, 1, 0, 0, 1);
    CGContextFillRect(context, CGRectMake (wd/3, ht/2 - 50, wd/4, ht/4));

    CGContextEndTransparencyLayer(context);

}
Quartz 2D 中的数据管理
简介
-
管理数据是每个图形应用程序所必须处理的工作。在 Quartz2D 中数据管理涉及到为Quartz2D 提供数据和从 Quartz 2D 中获取数据。
-
我们建议使用 Image I/O framework 来读取和写入数据。查看《Image I/O Programming Guide》可以获取更多关于 CGImageSourceRef 和 CGImageDestinationRef 的信息。
-
Quartz 可识别三种类型的数据源(source)和目标(destination)。
- URL:通过 URL 指定的数据可以作为数据的提供者和接收者。我们使用 CFURLRef 作为参数传递给 Quartz 函数。
- CFData:CFDataRef 和 CFMutableDataRef 可简化 Core Foundation 对象的内存分配行为。
- 原始数据:我们可以提供一个指向任何类型数据的指针,连同处理这些数据基本内存管理的回调函数集合。
- 这些数据都可以是图像数据或 PDF 数据。图像数据可以是任何格式的数据。Quartz 能够解析大部分常用的图像文件格式。
传输数据给 Quartz 2D
- 调用如下函数从数据源获取数据。其中部分函数需要手动引入 ImageIO.framework 并导入头文件 ImageIO/ImageIO.h。
CGImageSourceCreateWithDataProvider(CGDataProviderRef  _Nonnull provider, CFDictionaryRef  _Nullable options)
// To create an image source from a data provider.

CGImageSourceCreateWithData(CFDataRef  _Nonnull data, CFDictionaryRef  _Nullable options)
// To create an image source from a CFData object.

CGImageSourceCreateWithURL(CFURLRef  _Nonnull url, CFDictionaryRef  _Nullable options)
// To create an image source from a URL that specifies the location of image data.

CGPDFDocumentCreateWithURL(CFURLRef  _Nullable url)
// To create a PDF document from data that resides at the specified URL.

CGDataProviderCreateSequential(void * _Nullable info, const CGDataProviderSequentialCallbacks * _Nullable callbacks)
// To read image or PDF data in a stream. You supply callbacks to handle the data.

CGDataProviderCreateWithData(void * _Nullable info, const void * _Nullable data, size_t size, CGDataProviderReleaseDataCallback  _Nullable releaseData)
// To read a buffer of image or PDF data supplied by your application. You provide a callback to release the memory you allocated for the data.

CGDataProviderCreateWithURL(CFURLRef  _Nullable url)
// Whenever you can supply a URL that specifies the target for data access to image or PDF data.

CGDataProviderCreateWithCFData(CFDataRef  _Nullable data)
// To read image or PDF data from a CFData object.
-
所有的这些函数,除了 CGPDFDocumentCreateWithURL,都返回一个图像源(CGImageSourceRef)或者数据提供者(CGDataProviderRef)。图像源和数据提供者抽象了数据访问工作,并避免了程序去管理原始内存缓存。
-
CFPDFDocumentCreateWithURL 函数可以方便地从 URL 指定的文件创建 PDF 文档。
-
图像源是将图像数据传输给 Quartz 的首选方式。图像源可表示很多种图像数据。一个图像源可表示多于一个图像,也可表示缩略图、图像的属性和图像文件。当我们拥有 CGImageSourceRef 对象后,我们可以完成如下工作。
- 使用函数 CGImageSourceCreateImageAtIndex, CGImageSourceCreateThumbnailAtIndex,CGImageSourceCreateIncremental 创建图像(CGImageRef)。 一个 CGImageRef 数据类型表示一个单独的 Quartz 图像。
- 通过函数 CGImageSourceUpdateData 或 CGImageSourceUpdateDataProvider 来添加内容到图像源中。
- 使用函数 CGImageSourceGetCount,CGImageSourceCopyProperties 和 CGImageSourceCopyTypeIdentifiers 获取图像源的信息。
- 数据提供者是比较老的机制,它有很多限制。它们可用于获取图像或 PDF 数据。我们可以将数据提供者用于:
- 图像创建函数。如 CGImageCreate,CGImageCreateWithPNGDataProvider 或者 CGImageCreateWithJPEGDataProvider。
- PDF 文档的创建函数 CGPDFDocumentCreateWithProvider。
- 函数 CGImageSourceUpdateDataProvider 用于更新已存在的图像源。
- 关于图像的更多信息,可查看《Bitmap Images and Image Masks》
获取 Quartz 2D 的数据
- 调用如下函数从 Quartz 2D 中获取数据。其中部分函数需要手动引入 ImageIO.framework 并导入头文件 ImageIO/ImageIO.h。
CGImageDestinationCreateWithDataConsumer(CGDataConsumerRef  _Nonnull consumer, CFStringRef  _Nonnull type, size_t count, CFDictionaryRef  _Nullable options)
// To write image data to a data consumer.

CGImageDestinationCreateWithData(CFMutableDataRef  _Nonnull data, CFStringRef  _Nonnull type, size_t count, CFDictionaryRef  _Nullable options)
// To write image data to a CFData object.

CGImageDestinationCreateWithURL(CFURLRef  _Nonnull url, CFStringRef  _Nonnull type, size_t count, CFDictionaryRef  _Nullable options)
// Whenever you can supply a URL that specifies where to write the image data.

CGPDFContextCreateWithURL(CFURLRef  _Nullable url, const CGRect * _Nullable mediaBox, CFDictionaryRef  _Nullable auxiliaryInfo)
// Whenever you can supply a URL that specifies where to write PDF data.

CGDataConsumerCreateWithURL(CFURLRef  _Nullable url)
// Whenever you can supply a URL that specifies where to write the image or PDF data.

CGDataConsumerCreateWithCFData(CFMutableDataRef  _Nullable data)
// To write image or PDF data to a CFData object.

CGDataConsumerCreate(void * _Nullable info, const CGDataConsumerCallbacks * _Nullable cbks)
// To write image or PDF data using callbacks you supply.
-
所有这些函数,除了 CGPDFContextCreateWithURL,都返回一个图像目标(CGImageDestinationRef)或者数据消费者(CGDataComsumerRef)。图像目标和数据消费者抽象了数据写入工作,让Quartz来处理细节。
-
函数 CGPDFContextCreateWithURL 可以方便地将 PDF 数据写入 URL 指定的位置。
-
一个图像目标是获取 Quartz 数据的首选方式。与图像源一样,图像目标也可以表示很多图像数据,如一个单独图片、多个图片、缩略图、图像属性或者图片文件。在获取到CGImageDestinationRef 后,我们可以完成以下工作:
- 使用函数 CGImageDestinationAddImage 或者 CGImageDestinationAddImageFromSource 添加一个图像(CGImageRef)到目标中。一个 CGImageRef 表示一个图片。
- 使用函数 CGImageDestinationSetProperties 设置属性
- 使用函数 CGImageDestinationCopyTypeIdentifiers 和 CGImageDestinationGetTypeID 从图像目标中获取信息。
- 数据消费者是一种老的机制,有很多限制。它们用于写图像或 PDF 数据。我们可以将数据消费者用于:
- PDF上下文创建函数CGPDFContextCreate。该函数返回一个图形上下文,用于记录一系列的PDF绘制命令。
- 函数CGImageDestinationCreateWithDataConsumer,用于从数据消费者中创建图像目标。
- 关于图像的更多信息,可查看《Bitmap Images and Image Masks》
博客:xuyafei.cn
简书:jianshu.com/users/2555924d8c6e
微博:weibo.com/xuyafei86
Github:github.com/xiaofei86


