Java - 事件处理机制
Java - 事件处理机制
一、观察者模式
了解事件和监听,需要先了解观察者模式。
接下来介绍一个观察者模式的场景:
- 老师布置作业,通知学生;
- 学生观察到老师布置了作业,开始做作业
在这个场景中,学生就是观察者,老师是被观察者。但是:
教师作为被观察者,实际上把握主动。
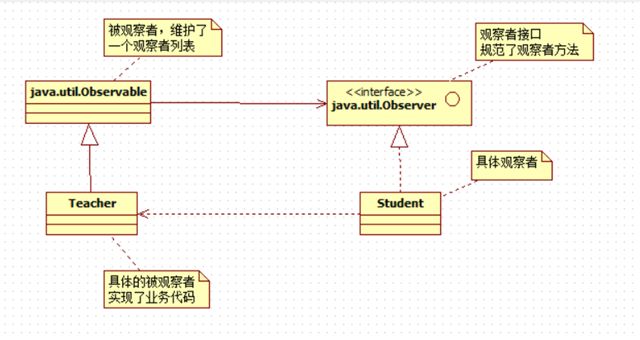
接下来实现上面的场景:
<center> v2-8d6726829e25797ba881cef61ebf84d7_hd.jpg-36.9kB
</center>
1.1 观察者
场景中的观察者是:学生
package event;

import java.util.Observable;

/**
 * Created by Joe on 2018/4/11
 */
public class Student implements java.util.Observer {

    private String name;

    public Student(String name) {
        this.name = name;
    }

    @Override
    public void update(Observable o, Object arg) {
        Teacher teacher = (Teacher) o;

        System.out.printf("学生%s观察到(实际是被通知)%s布置了作业《%s》 \n", this.name, teacher.getName(), arg);
    }
}
1.2 被观察者
在这个场景中是:老师
package event;

import java.util.ArrayList;
import java.util.List;

/**
 * Created by Joe on 2018/4/11
 */
public class Teacher extends java.util.Observable {
    private String name;
    private List<String> books;

    public Teacher(String name) {
        this.name = name;
        this.books = new ArrayList<>();
    }

    public String getName() {
        return name;
    }

    public void setHomework(String homework) {
        System.out.println(this.name + "布置的作业为:" + homework);
        books.add(homework);

        setChanged();
        notifyObservers(homework);
    }
}
1.3 测试
package event;

/**
 * Created by Joe on 2018/4/11
 */
public class Clients {

    public static void main(String[] args) {
        Student student1= new Student("张三");
        Student student2 = new Student("李四");
        Teacher teacher1 = new Teacher("菜");
        teacher1.addObserver(student1);
        teacher1.addObserver(student2);
        teacher1.setHomework("事件机制第一天作业");
    }

}
代码的运行结果为:
菜布置的作业为:事件机制第一天作业
学生李四观察到(实际是被通知)菜布置了作业《事件机制第一天作业》
学生张三观察到(实际是被通知)菜布置了作业《事件机制第一天作业》
在语义理解上面,观察是一个主动行为,但是在代码实现中,update()方法是由"被观察者"Teacher主动调用,具体的调用代码如下:
setChanged();
notifyObservers(homework);
更具体的部分我们可以借助IDE进入方法体的源码中进行查看,主动调用观察者进行操作的是notifyObservers()方法,该方法的参数如下:
/**
 * If this object has changed, as indicated by the
 * <code>hasChanged</code> method, then notify all of its observers
 * and then call the <code>clearChanged</code> method to indicate
 * that this object has no longer changed.
 * <p>
 * Each observer has its <code>update</code> method called with two
 * arguments: this observable object and the <code>arg</code> argument.
 *
 * @param   arg   any object.
 * @see     java.util.Observable#clearChanged()
 * @see     java.util.Observable#hasChanged()
 * @see     java.util.Observer#update(java.util.Observable, java.lang.Object)
 */
public void notifyObservers(Object arg)
这个方法中调用update方法的代码如下:
for (int i = arrLocal.length-1; i>=0; i--)
        ((Observer)arrLocal[i]).update(this, arg);
通过for循环依次调用观察者的update方法。
1.4 观察者模式用意
- 在代码中我们可以发现教师类和学生类无关,并只依赖
java.util.Observable。如果讲课范围扩大,比如也需要给其他老师讲课,那么也只需要老师实现java.util.Observer,并且将其他老师加入授课老师的观察者列表中即可。 - 观察者分离了观察者和被观察者自身的责任,让类各自维护自己的功能,提高了系统的可重用性;
- 观察看上去是一个主动的行为,但是其实观察者不是主动调用自己的业务代码的,相反,是被观察者调用的。所以,观察者模式还有另一个名字,叫发布-订阅模式。
观察者模式还有另外一种形态,就是事件驱动模型,这两种方式在实现机制上是非常接近的,在理解了观察者模式的基础上,理解事件驱动,就非常简单了。
二、事件驱动模型初窥
事件驱动模型是观察者模式的升级,其中的对应关系为:
- 观察者对应监听器(学生)
- 被观察者对应事件源(教师)
在这里:事件源产生事件,事件带有事件源,监听器则监听事件。其中一共会牵扯四个类
- 事件源(即教师,被观察者)
- 事件
- 监听器接口
- 具体的监听器(即学生,观察者)
而在JDK中,有现成的监听器接口,代码如下:
package java.util;

/**
* A tagging interface that all event listener interfaces must extend.
* @since JDK1.1
*/
public interface EventListener {
}
甚至连一个声明的方法都没有,那它存在的意义在哪?还记得面向对象中的上溯造型吗,所以它的意义就在于告诉所有的调用者,我是一个监听器。
上溯造型指将衍生类的句柄赋给基础类的句柄(即是将子类的句柄赋给父类的句柄,也即把子类当做父类处理的过程),因为它是从一个更特殊的类型到一个更常规的类型,所以上溯造型肯定是安全的。
接下来继续看事件,事件里面会含有getSource方法,这个方法返回的是事件源(即教师,被观察者)对象。
/*
 * Copyright (c) 1996, 2003, Oracle and/or its affiliates. All rights reserved.
 * ORACLE PROPRIETARY/CONFIDENTIAL. Use is subject to license terms.
 */

package java.util;

/**
 * <p>
 * The root class from which all event state objects shall be derived.
 * <p>
 * All Events are constructed with a reference to the object, the "source",
 * that is logically deemed to be the object upon which the Event in question
 * initially occurred upon.
 *
 * @since JDK1.1
 */

public class EventObject implements java.io.Serializable {

    private static final long serialVersionUID = 5516075349620653480L;

    /**
     * The object on which the Event initially occurred.
     */
    protected transient Object  source;

    /**
     * Constructs a prototypical Event.
     *
     * @param    source    The object on which the Event initially occurred.
     * @exception  IllegalArgumentException  if source is null.
     */
    public EventObject(Object source) {
        if (source == null)
            throw new IllegalArgumentException("null source");

        this.source = source;
    }

    /**
     * The object on which the Event initially occurred.
     *
     * @return   The object on which the Event initially occurred.
     */
    public Object getSource() {
        return source;
    }

    /**
     * Returns a String representation of this EventObject.
     *
     * @return  A a String representation of this EventObject.
     */
    public String toString() {
        return getClass().getName() + "[source=" + source + "]";
    }
}
事件驱动模型中,JDK的设计者们进行了高级的抽象,就是让上层类只是代表了:我是一个事件(含有事件源),或,我是一个监听者!
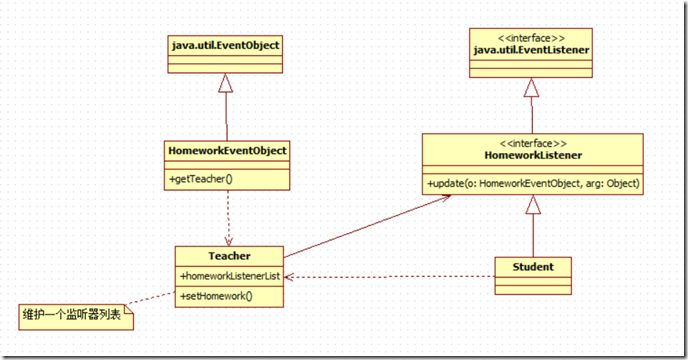
2.1 老师布置作业的事件驱动模型版本
类图如下:
<center> v2-5bcecc4f7be03812ae70eb947988106b_hd.jpg-39.9kB
</center>
2.2 观察者接口
观察者接口(学生)。由于在事件驱动模型中,只有一个没有任何方法的接口,EventListener,所以,我们可以先实现一个自己的接口。为了跟上一篇的代码保持一致,在该接口中我们声明的方法的名字也叫update。注意,我们当然也可以不取这个名字,甚至还可以增加其它的方法声明。
package events;

import java.util.Observable;

/**
 * Created by Joe on 2018/4/11
 */
public interface HomeworkListener extends java.util.EventListener {

    public void update(HomeworkEventObject o, Object arg);
}
2.3 观察者类
学生
package events;

/**
 * Created by Joe on 2018/4/11
 */
public class Student implements HomeworkListener{
    private String name;
    public Student(String name){
        this.name = name;
    }
    @Override
    public void update(HomeworkEventObject o, Object arg) {
        Teacher teacher = o.getTeacher();
        System.out.printf("学生%s观察到(实际是被通知)%s布置了作业《%s》 \n", this.name, teacher.getName(), arg);
    }

}
2.4 事件子类
package events;

/**
 * Created by Joe on 2018/4/11
 */
public class HomeworkEventObject extends java.util.EventObject {

    public HomeworkEventObject(Object source) {
        super(source);
    }
    public HomeworkEventObject(Teacher teacher) {
        super(teacher);
    }
    public Teacher getTeacher(){
        return (Teacher) super.getSource();
    }

}
2.5 被观察者
教师
package events;

/**
 * Created by Joe on 2018/4/11
 */
import java.util.*;

public class Teacher {
    private String name;
    private List<String> homeworks;
    /*
    * 教师类要维护一个自己监听器(学生)的列表,为什么?
    * 在观察者模式中,教师是被观察者,继承自java.util.Observable,Observable中含了这个列表
    * 现在我们没有这个列表了,所以要自己创建一个
    */
    private Set<HomeworkListener> homeworkListenerList;

    public String getName() {
        return this.name;
    }

    public Teacher(String name) {
        this.name = name;
        this.homeworks = new ArrayList<String>();
        this.homeworkListenerList = new HashSet<HomeworkListener>();
    }

    public void setHomework(String homework) {
        System.out.printf("%s布置了作业%s \n", this.name, homework);
        homeworks.add(homework);
        HomeworkEventObject event = new HomeworkEventObject(this);
        /*
        * 在观察者模式中,我们直接调用Observable的notifyObservers来通知被观察者
        * 现在我们只能自己通知了~~
        */
        for (HomeworkListener listener : homeworkListenerList) {
            listener.update(event, homework);
        }

    }
    public void addObserver(HomeworkListener homeworkListener){
        homeworkListenerList.add(homeworkListener);
    }

}
-
Teacher没有父类了,Teacher作为事件中的事件源Source被封装到HomeworkEventObject中了。这没有什么不好的,业务对象和框架代码隔离开来,解耦的非常好,但是正因为如此,我们需要在Teacher中自己维护一个Student的列表,于是,我们看到了homeworkListenerList这个变量
-
在观察者模式中,我们直接调用Observable的notifyObservers来通知被观察者,现在我们只能靠自己了,于是我们看到了这段代码
for (HomeworkListener listener : homeworkListenerList) {
    listener.update(event, homework);
}
2.6 客户端代码
package events;

/**
 * Created by Joe on 2018/4/11
 */
public class Clients {
    public static void main(String[] args) {
        Student student1= new Student("张三");
        Student student2 = new Student("李四");
        Teacher teacher1 = new Teacher("zuikc");
        teacher1.addObserver(student1);
        teacher1.addObserver(student2);
        teacher1.setHomework("事件机制第二天作业");
    }
}
2.7 总结
从客户端的角度来说,我们几乎完全没有更改任何地方,跟观察者模式的客户端代码一模一样,但是内部的实现机制上,我们却使用了事件机制。
现在我们来总结下,观察者模式和事件驱动模型的几个不同点:
- 事件源不再继承任何模式或者模型本身的父类,彻底将业务代码解耦出来;
- 在事件模型中,每个监听者(观察者)都需要实现一个自己的接口。没错,比如鼠标事件,分别有单击、双击、移动等等的事件,这分别就是增加了代码的灵活性;
三、Java中的事件处理
3.1 鼠标点击事件处理模型基础版
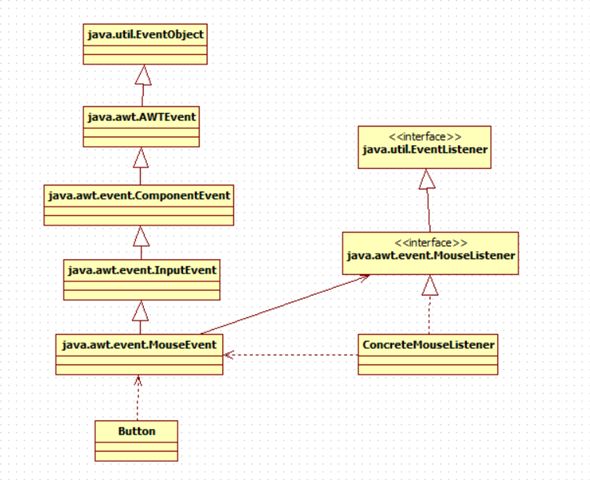
对应HomeworkListener,JDK中有MouseListener,并且这个接口也继承自EventListener。
/**
 * The listener interface for receiving "interesting" mouse events
 * (press, release, click, enter, and exit) on a component.
 * (To track mouse moves and mouse drags, use the
 * <code>MouseMotionListener</code>.)
 * <P>
 * The class that is interested in processing a mouse event
 * either implements this interface (and all the methods it
 * contains) or extends the abstract <code>MouseAdapter</code> class
 * (overriding only the methods of interest).
 * <P>
 * The listener object created from that class is then registered with a
 * component using the component's <code>addMouseListener</code>
 * method. A mouse event is generated when the mouse is pressed, released
 * clicked (pressed and released). A mouse event is also generated when
 * the mouse cursor enters or leaves a component. When a mouse event
 * occurs, the relevant method in the listener object is invoked, and
 * the <code>MouseEvent</code> is passed to it.
 *
 * @author Carl Quinn
 *
 * @see MouseAdapter
 * @see MouseEvent
 * @see <a href="https://docs.oracle.com/javase/tutorial/uiswing/events/mouselistener.html">Tutorial: Writing a Mouse Listener</a>
 *
 * @since 1.1
 */
public interface MouseListener extends EventListener
接下来我们对这个接口进行实现,命名为ConcreteMouseListener:
package events;

/**
 * Created by Joe on 2018/4/11
 */
import java.awt.event.MouseEvent;
import java.awt.event.MouseListener;


public class ConcreteMouseListener implements MouseListener {
    @Override
    public void mouseClicked(MouseEvent e) {
        System.out.println("I haven been clicked by" + e.getSource().toString());
    }

    @Override
    public void mousePressed(MouseEvent e) {

    }

    @Override
    public void mouseReleased(MouseEvent e) {

    }

    @Override
    public void mouseEntered(MouseEvent e) {

    }

    @Override
    public void mouseExited(MouseEvent e) {

    }
}
在这里面,我们单独为单击的事件处理器进行了代码实现。
事件处理器:监听器的具体实现类的实现方法,就叫事件处理器。
接下来需要注意的是MouseEvent,首先看这个类的简单用法:
/*
 * 这里的new Component() {} 就是 event.getSource() 得到的事件源 source
 */
MouseEvent event = new MouseEvent(new Component() {}, 1, 1, 1, 2, 3, 4,false);
在实际且正常的情况下,MouseEvent是没有必要自己new的,JAVA运行时会捕获硬件鼠标的点击动作,由虚拟机底层为我们生成该实例对象,这些构造函数参数中核心关键参数就是第一个参数new Component(),回头看看我们的教师学生版本是在哪里生产事件的:
public void setHomework(String homework) {
    System.out.printf("%s布置了作业%s \n", this.name, homework);
    homeworks.add(homework);
    HomeworkEventObject event = new HomeworkEventObject(this);
    /*
    * 在观察者模式中,我们直接调用Observable的notifyObservers来通知被观察者
    * 现在我们只能自己通知了~~
    */
    for (HomeworkListener listener : homeworkListenerList) {
        listener.update(event, homework);
    }
}
是在Teacher的业务代码setHomeworkf方法中。但是,在当前的我们要写的这个例子中,new MouseEvent()要在哪里呢?我们在Button的业务代码中进行调用。Button是谁,Button就类似Teacher,但又不完全等同Teacher,在Teacher中,Teacher本身就是事件源,所以它这个this作为参数传入进了HomeworkEventObject,而Button不能作为参数传入进MouseEvent,因为我不打算让Button继承自Component,所以我们先new了一个临时的Component。OK,分析到了这里,我们自己的Button代码大概就出来了,是这个样子的:
import java.awt.Component;
import java.awt.event.MouseEvent;
import java.awt.event.MouseListener;

public class Button {
    private MouseListener mouseListener;

    public void addMouseListener(MouseListener l) {
        mouseListener = l;

    }

    public void doClick() {
        /*
         * 这里的new Component() {} 就是 event.getSource() 得到的事件源 source
         */
        MouseEvent event = new MouseEvent(new Component() {}, 1, 1, 1, 2, 3, 4, false);

        //event.getSource();
        this.mouseListener.mouseClicked(event);
    }
}
至此,我们可以画出清晰的类图了:
<center> v2-4f347701be1d8872b31b92cd22cf15d8_hd.jpg-48.7kB
</center>
接下来实现客户端代码:
public class Clients {
    public static void main(String[] args) {
        ConcreteMouseListener
                listener = new ConcreteMouseListener();
        Button button = new Button();

        button.addMouseListener(listener);
        button.doClick();

    }
}
可以得到以下输出:
I haven been clicked byevents.Button$1[,0,0,0x0,invalid]
3.2 正常窗体程序
接下来创建一个窗体,窗体上放置了一个按钮,点击了之后,执行了一行代码。
import javax.swing.*;
import java.awt.*;
import java.awt.event.MouseEvent;
import java.awt.event.MouseListener;

/**
 * Created by Joe on 2018/4/11
 */
public class Clients {
    public static void main(String[] args) {
        new DemoFrame();

    }

    static class DemoFrame extends JFrame implements MouseListener {


        public DemoFrame() {
            super("demo");

            this.setSize(500, 400);
            this.setLocationRelativeTo(null);

            this.getContentPane().setLayout(null);

            this.setVisible(true);


            JButton button1 = new JButton("ok");
            button1.setBounds(8,
                    8, 80, 80);
            button1.addMouseListener(this);

            this.getContentPane().add(button1);
        }


        @Override
        public void mouseClicked(MouseEvent e) {
            System.out.println("I haven been clicked by" + e.getSource().toString());
        }


        @Override
        public void mousePressed(MouseEvent e) {
        }


        @Override
        public void mouseReleased(MouseEvent e) {
        }


        @Override
        public void mouseEntered(MouseEvent e) {
        }


        @Override
        public void mouseExited(MouseEvent e) {
        }

    }
}
接下来把监听器、事件处理器、事件、事件源都指出来。
- 监听器:DemoFrame就是监听器,对应ConcreteMouseListener;
- 事件处理器:MouseClicked方法就是监听器,ConcreteMouseListener里面也有这个方法;
- 事件:JAVA运行时捕获到硬件鼠标触发,从而调用了事件处理器,在事件处理器内部生成的MouseEvent,就是事件;
- 事件源:JAVA运行时捕获到硬件鼠标触发,从而调用了事件处理器,在事件处理器内部生成的target,就是事件源;
以上代码的输出为:
I haven been clicked byjavax.swing.JButton[,8,8,80x80,alignmentX=0.0,alignmentY=0.5,border=javax.swing.plaf.BorderUIResource$CompoundBorderUIResource@3ef244c,flags=296,maximumSize=,minimumSize=,preferredSize=,defaultIcon=,disabledIcon=,disabledSelectedIcon=,margin=javax.swing.plaf.InsetsUIResource[top=2,left=14,bottom=2,right=14],paintBorder=true,paintFocus=true,pressedIcon=,rolloverEnabled=true,rolloverIcon=,rolloverSelectedIcon=,selectedIcon=,text=ok,defaultCapable=true]
参考文章:


