在centos6.5上安装redmine 2.53
redmine是很适合用于小型团队的项目管理软件,而且开源,界面也清爽,功能也全面。不过它是ruby开发的,各种调试不太适应,庆幸的是按照官网文档step by step就可以很容易完成部署了,redmine对安装步骤要求和安装版本比较严格,要一丝不苟。
关于这个安装部署,官网文档并不能适用于所有情况,所以记录本次安装的过程也能更好的记录下适配当前我遇到的情况。
step 1:安装相关软件环境依赖
yum -y install zip unzip libyaml-devel zlib-devel curl-devel openssl-devel httpd-devel apr-devel apr-util-devel mysql-devel gcc ruby-devel gcc-c++ make postgresql-devel ImageMagick-devel sqlite-devel perl-LDAP mod_perl perl-Digest-SHA
step 2:安装apache和mysql
yum -y install httpd mysql mysql-server
因为无需要做极限的优化,能够正常使用就行,yum 安装套件还是很适合一般使用的,最大的好处就是一键完成。
step 3:将apache和mysql配置为开机自启动,并在当下启动apache和mysql,以便做余下的配置
chkconfig httpd on
chkconfig mysqld on

service httpd start
service mysqld start
step 4:配置mysql 账号密码信息,使用mysql_secure_installation来配置,也是一个简单的交互式配置工具
按照提示完成配置即可
Because we not have a password for the root account so you press Enter to skip.
Enter current password for root (enter for none):      #输入当前mysql的root密码,因为yum套件关系,root密码为空,直接回车即可
Select Yes to set the password for the MySQL root account.  #是否设置新的mysql root密码,选是
Set root password? [Y/n] y
Enter and confirm your password, remove the anonymous user, select Yes
Remove anonymous users? [Y/n] y   #是否移除匿名用户,安全起见,选是
Allow remote login to MySQL as root account, select No.
Disallow root login remotely? [Y/n] n #是否关闭root远程登录,看你如何选择了,官网说否,如果不是外网服务器的话,开放也无所谓。
Delete the test database, select Yes
Remove test database and access to it? [Y/n] y  #移除测试数据库
Reload privilege tables, select Yes  #刷新权限配置信息
Reload privilege tables now? [Y/n] y
step 5: 关闭selinux
编辑该文件,然后改为以下内容
vi /etc/selinux/config
SELINUX=disabled
编辑保存退出后,输入以下命令,不重启系统关闭selinux
setenforce 0
注:
setenforce 1 设置SELinux 成为enforcing模式
setenforce 0 设置SELinux 成为permissive模式,即关闭selinux
step 6 :关闭iptables
service iptables stop

chkconfig iptables off
因为不是外网服务器用不到iptables做安全过滤。
step 7:安装php和phpmyadmin(选做)
因为redmine是ruby开发,安装php和phpmyadmin主要是为了方便管理mysql数据库
yum -y install php php-mysql php-gd php-imap php-ldap php-mbstring php-odbc php-pear php-xml php-xmlrpc php-pecl-apc php-soap
重启apache
service httpd restart
安装phpmyadmin
rpm --import http://dag.wieers.com/rpm/packages/RPM-GPG-KEY.dag.txt
yum install http://pkgs.repoforge.org/rpmforge-release/rpmforge-release-0.5.3-1.el6.rf.x86_64.rpm
yum -y install phpmyadmin
建立apache配置文件
vi /etc/httpd/conf.d/phpmyadmin.conf
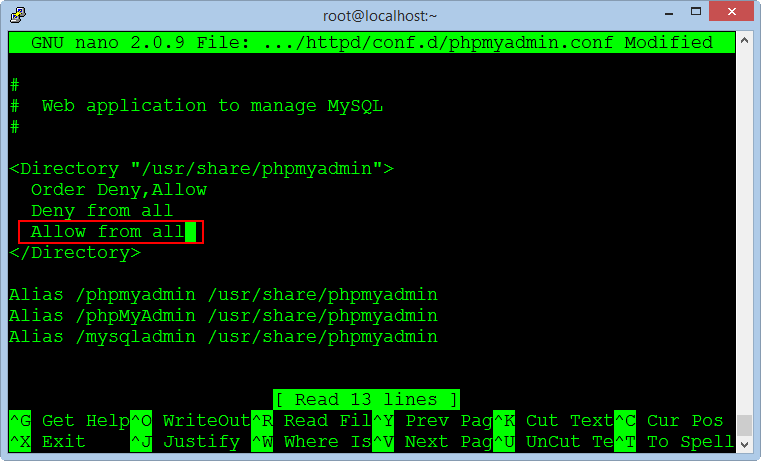
将Allow from 127.0.0.1 改为Allow from all,让所有人都可以访问
修改phpmyadmin的验证方式为cookie,官网是改成http的,我这里使用cookie,我觉得cookie更方便
vi /usr/share/phpmyadmin/config.inc.php
$cfg['Servers'][$i]['auth_type'] = 'cookie';
貌似新版本的都默认cookie了
添加mysql 用户名和密码,因为验证是使用mysql的账号密码来验证的,默认配置文件没有,所以需要手动添加
$cfg['Servers'][$i]['user'] = 'root'; // MySQL user 访问phpmyadmin使用的mysql用户名
$cfg['Servers'][$i]['password'] = ''; // MySQL password (only needed对应上述mysql用户名的密码
配置短语密码(blowfish_secret)
$cfg['blowfish_secret'] = '';
如果认证方法设置为cookie,就需要设置短语密码,这个短语密码是需要生成才比较安全的,置于他的机制是cookie的加密密码。
相关信息:
https://wiki.archlinux.org/index.php/PhpMyAdmin#Add_blowfish_secret_passphrase
访问这个页面可以自动生成一个质量好的短语密码
http://www.question-defense.com/tools/phpmyadmin-blowfish-secret-generator
配置完成后重启apache
service httpd restart
验证phpmyadmin是否可以用(用mysql账号密码登陆)
step 8:安装ruby
完整运行以下命令
\curl -L https://get.rvm.io | bash
运行成功会生成一个文件,然后运行以下命令
source /etc/profile.d/rvm.sh
安装ruby 1.9.3
rvm install 1.9.3
注:
这个ruby版本很考究的,目前安装官网文档,安装redmine 2.5X的都可以用1.9.3
安装完成后检查ruby版本
ruby -v
安装rubygems
yum -y install rubygems
注:rubygems是Ruby's packages management program 包管理程序,相当于yum 或者apt-get,所有ruby的东西由它来保(an)护(zhuang)
安装Passenger
gem install passenger

passenger-install-apache2-module
注:
The full name of the Passenger is Phusion Passenger, known as mod_rails or mod_rack, it is a web application intergrate with Apache and it can operate as a standalone web server support for the Ruby On Rails applications.
总的来说就是ruby和apache结合的代谢物
上述安装完成后会提出提示
如:
<a href="http://www.godblessyuan.com/wp-content/uploads/2015/01/centos6-5_install_redmine2-53__01.png"><img src="http://www.godblessyuan.com/wp-content/uploads/2015/01/centos6-5_install_redmine2-53__01.png" alt="centos6-5_install_redmine2-53__01" width="901" height="98" class="alignnone size-full wp-image-41" /></a>
.......等
这个是官网当时做教程的时候的版本,现在的版本有变化了,一切已事实为准,注意是安装完成的提示,复制出来然后使用,将复制的内容保存为一个新的apache配置文件
vi /etc/httpd/conf.d/passenger.conf
粘贴内容后保存退出
重启apache
service httpd restart
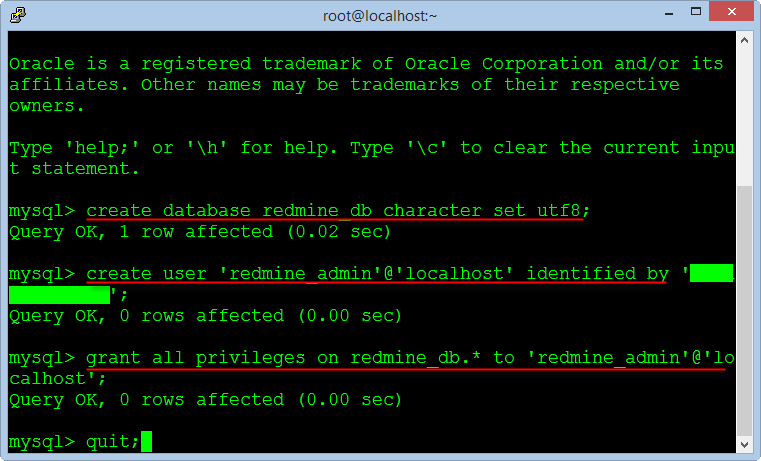
step 9: 创建redmine数据库
mysql --user=root --password=root_password_mysql #命令行登录数据库

create database redmine_db character set utf8;  #创建数据库
create user 'redmine_admin'@'localhost' identified by 'your_new_password'; #创建用户
grant all privileges on redmine_db.* to 'redmine_admin'@'localhost';  #授权

quit;
step 10:安装redmine
cd /var/www #yum套件的web文件存放目录
wget http://www.redmine.org/releases/redmine-2.5.0.tar.gz #下载最新版本,只要是2.5X范围即可
tar xvfz redmine-2.5.0.tar.gz
mv redmine-2.5.0 redmine
rm -rf redmine-2.5.0.tar.gz
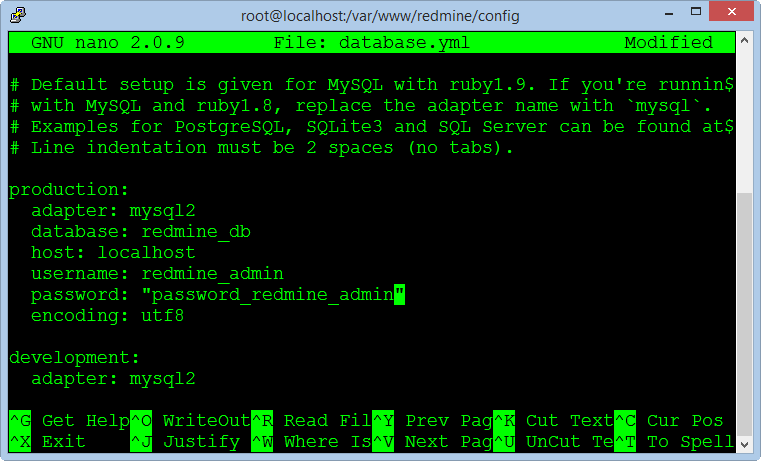
cd /var/www/redmine/config
cp database.yml.example database.yml
vi database.yml #输入mysql访问信息,账号,密码,数据库名字,使用第一个production配置,编辑完成后保存退出
step 11:安装rails
cd /var/www/redmine
gem install bundler
bundle install
rake generate_secret_token
注:因为墙哥的原因,所以不能直接安装官网源,所以需要先做一步,然后再执行gem install bundler和其他命令
gem sources --remove https://rubygems.org/

gem sources -a http://ruby.taobao.org/   #执行失败的原因是网址格式没有完全一致,不能少一个/或者字母

gem sources -l
*** CURRENT SOURCES ***

http://ruby.taobao.org
确保只有 ruby.taobao.org
安装过程稍稍比较缓慢,耐心等待。
安装完成后初始化数据库,默认选择即可。
RAILS_ENV=production rake db:migrate
RAILS_ENV=production rake redmine:load_default_data
step 12:激活fcgi
cd /var/www/redmine/public
mkdir plugin_assets
cp dispatch.fcgi.example dispatch.fcgi
cp htaccess.fcgi.example .htaccess
step 13: 安装Apache and FastCGI模块
cd /var/www/
rpm --import https://fedoraproject.org/static/0608B895.txt
wget http://dl.fedoraproject.org/pub/epel/6/x86_64/epel-release-6-8.noarch.rpm
rpm -ivh epel-release-6-8.noarch.rpm
yum -y install mod_fcgid
rm -rf epel-release-6-8.noarch.rpm
step 14:创建redmine的文件存储位置
mkdir -p /opt/redmine/files  #这里官网是选了一个自定义的位置,这个随你喜欢,但以此作为例子,文件目录无所谓,只要保证权限能够被redmine访问即可
chown -R apache:apache /opt/redmine
cd /var/www/redmine/config
cp configuration.yml.example configuration.yml
vi configuration.yml
修改attachements_storage_path: 为你想要配置的目录即可。
step 15:配置email,redmine可以与邮件联动,类似通知提示。
vi /var/www/redmine/config/configuration.yml
有很多种方式,我这边一般使用第三方邮件系统,方便。
  email_delivery:
   delivery_method: :smtp
   smtp_settings:
        enable_starttls_auto: true
        address: "smtp.gmail.com"
        port: 587
        domain: "smtp.gmail.com"
        authentication: :plain
        user_name: "your_email@gmail.com"
        password: "your_password"
注:这里需要注意是格式不能写错,要完全安装它的格式来修改,另外delivery method使用smtp,不要使用async,如果发邮件慢了的话,redmine也会被卡住,访问缓慢。另外第三方邮件系统有固有的配置方式,参考着配置就可以了,需要有一个独立的邮件发信账号就可以了。
step 16:创建redmine虚拟主机
vi /etc/httpd/conf.d/redmine.conf
<a href="http://www.godblessyuan.com/wp-content/uploads/2015/01/centos6-5_install_redmine2-53__02.png"><img src="http://www.godblessyuan.com/wp-content/uploads/2015/01/centos6-5_install_redmine2-53__02.png" alt="centos6-5_install_redmine2-53__02" width="399" height="224" class="alignnone size-full wp-image-42" /></a>
注:redmine目录要正确,指定好对于的域名。
授权apache权限到redmine目录,以便apache可以访问redmine
cd /var/www
chown -R apache:apache redmine
chmod -R 755 redmine
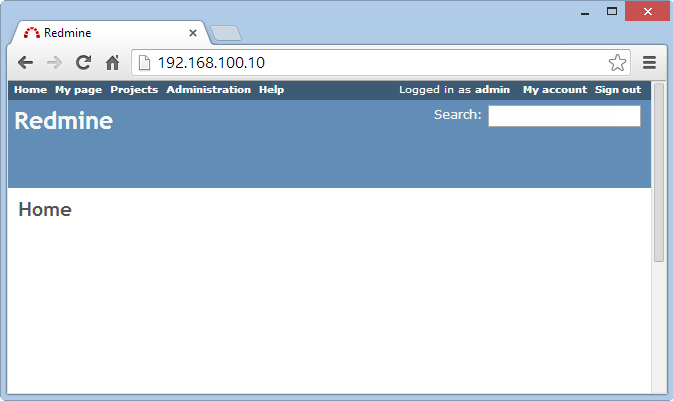
service httpd restart
万恶分割线下是 trouble-shooting
-
重启apache报错
service httpd restart
Stopping httpd:[FAILED]
Starting httpd: httpd: Syntax error on line 221 of /etc/httpd/conf/httpd.conf: Syntax error on line 1 of /etc/httpd/conf.d/passenger.conf: Cannot load /usr/local/rvm/gems/ruby-1.9.3-p550/gems/passenger-4.0.53/buildout/apache2/mod_passenger.so into server: /usr/local/rvm/gems/ruby-1.9.3-p550/gems/passenger-4.0.53/buildout/apache2/mod_passenger.so: failed to map segment from shared object: Permission denied
[FAILED]
需要查看apache的日志和redmine的日志REDMINE_DIR/log/production.log
网上查到可以参考的方法,但一定以日志为准,不然就解决不了了:
chcon -R -h -t httpd_sys_script_exec_t /usr/local/rvm/gems/ruby-2.0.0-p353/gems/passenger-4.0.33/buildout/apache2/mod_passenger.so #需要注意ruby版本号和passenger版本目录
or
ruby版本不对,这个可能是错误安装没安装文档step by step安装导致的
重装ruby即可,当然最好是全部推倒重来。
http://stackoverflow.com/questions/4464985/rails-3-ruby-1-9-2-does-it-need-usr-bin-ruby1-8
-
访问redmine主页出现报错
"Internal error
An error occurred on the page you were trying to access.
If you continue to experience problems please contact your Redmine administrator for assistance.
If you are the Redmine administrator, check your log files for details about the error.
还是需要查看apache的日志和redmine的日志REDMINE_DIR/log/production.log
一般原因是没有初始化数据库,重新初始化即可
RAILS_ENV=production rake db:migrate
RAILS_ENV=production rake redmine:load_default_data
http://www.redmine.org/boards/2/topics/12458
鸣谢:
http://www.redmine.org/projects/redmine/wiki/Install_Redmine_25x_on_Centos_65_complete
原文链接:http://www.godblessyuan.com/2015/01/07/centos6-5_install_redmine2-53/


