Tangram与VirtualView初探
标签(空格分隔): 阿里 virtualview tangram
前言
在进入VirtualView之前,我们首先来了解下Tangram这个同样是阿里出品、用于快速实现组合布局的框架模型。
Tangram
移动端原生App最大的弱点就是不能像Web端那样即改即用,需要等下一个版本发布之后才能看到效果。所以衍生出来许许多多的动态化方案,如RN等;但在动态化与性能方面又不是那么完美。所以Tangram方案由此诞生。
背景:技术是用于满足需求业务的解决方案,现有的需求业务被其分为了三类:基础业务、常规业务与临时性业务
| 业务类型 | 定义 | 功能例子 | 性能要求 | 现有解决方案 |
|---|---|---|---|---|
| 基础业务 | 产品最基础的功能需求 | 注册、登陆 | 需求稳定,对稳定性及性能要求最高 | 原生Native |
| 常规业务 | 产品较为常规的功能需求 | 首页 | 需求变化少,对稳定性及性能要求较高 | RN |
| 临时性业务 | 产品临时性的功能需求 | 活动页 | 需求变化大,对稳定性及性能要求低 | WebView+HTML |
对于临时性业务,使用WebView+HTML开发已然足够,随着WebView性能的提升和Mobile开发框架与开发技能日趋成熟,现阶段HTML体现出的劣势终将荡然无存。
对于基础业务,其稳定性及性能要求非常高,而需求变化少,所以采用原生开发是最好的选择。
Tangram是主要针对的是常规业务(对动态化有着要求,也对性能有要求)的解决方案。其基本理念是粗粒度组件化+灵活布局容器,关注的重点是面向业务,多终端一致性和高性能。
Tangram优点:高性能(页面渲染效率&组件回收复用,跨父节点组件的高效回收与复用);面向业务(组件业务化,动态化,通过布局+组件的形式搭建整个页面,而不是从基本的UI元素搭建页面);扩展性好(自定义组件可以注入);多终端一致性(一个json描述的布局可以同时在iOS端与Android端使用,且表现一致)。
组件->卡片->页面
集成过程:
- 初始化Tangram
//全局只需要初始化一次,提供一个通用的图片加载器(如Picasso)以及一个应用内通用的ImageView类型
TangramBuilder.init(context, new IInnerImageSetter() {
    @Override
    public <IMAGE extends ImageView> void doLoadImageUrl(IMAGE view, String url) {
        //假设你使用 Picasso 加载图片
        Picasso.with(context).load(url).into(view);
    }
}, ImageView.class);
- 注册自定义卡片与组件
//TangramBuilder中已经预先注册了许多组件及卡片,可直接使用;此处只需要注册自定义的组件及卡片即可
builder = TangramBuilder.newInnerBuilder(this);
builder.registerCell("自定义名字1", 自定义组件1.class);
builder.registerCell("自定义名字2", 自定义组件2.class);
builder.registerCard("自定义名字3", 自定义卡片3.class);
builder.registerCell(数字, 自定义组件4.class);
builder.registerVirtualView("VirtualView名字");//Tangram对VirtualView的支持
- 生成TangramEngine实例
engine = builder.build();
engine.setVirtualViewTemplate(VirtualView模版编绎后的字节码);
- 绑定业务support类到engine
engine.addSimpleClickSupport(new XXClickSupport()); //添加点击事件支持
engine.addCardLoadSupport(new XXCardLoadSupport()); //添加加载更多支持
engine.addExposureSupport(new XXExposureSuport());  //添加曝光事件支持
- 绑定recyclerView,监听Scroll事件
recyclerView.addOnScrollListener(new RecyclerView.OnScrollListener() {
    @Override
    public void onScrolled(RecyclerView recyclerView, int dx, int dy) {
        super.onScrolled(recyclerView, dx, dy);
        engine.onScrolled();
    }
});
- 加载数据并传递给engine
String jsonString = getJsonStringFromFile(jsonFilePath);
JSONArray data = null;
try {
    data = new JSONArray(jsonString);
    engine.setData(data);
} catch (JSONException e) {
    e.printStackTrace();
}
一个Json数据示例:
[
  {
    "type": "container-scroll",  //预定义卡片类型-类似ScrollView
    "style": {  //该卡片的一些样式及属性
      "pageWidth": 200,
      "pageHeight": 100,
      "indicatorMargin": "5",
      "infinite": "true"
    },
    "items": [  //该卡片内的一些组件
      {
        "type": 1, // 第一个组件的类型,必须是已经注册过的;未被注册过的将会被忽略
        "msg": "info1", // 该对应组件的相关数据等
        "style": {}
      },
      {
        "type": 1,
        "msg": "info2",
        "style": {}
      }
    ]
  },
  {
    "type": "10",  // 第二个卡片的类型
    "style": {
      "indicatorMargin": "5",
      "infinite": "true"
    },
    "items": [
      {
        "type": 1,
        "msg": "info1",
        "style": {}
      },
      {
        "type": 1,
        "msg": "info2",
        "style": {}
      }
    ]
  }
]
VirtualView
Tangram中已经实现了页面布局的动态化,我们可以通过配置json文件自由的布局;但还有一个局限性,json中使用的卡片或者组件的type,必须是注册OK的(也就是在客户端已经实现好的)才能使用;如果想要在原来的版本中新增一个type类型的组件,这是没有办法做到的,还是只能通过升级客户端来实现。
于是,VirtualView出现了。
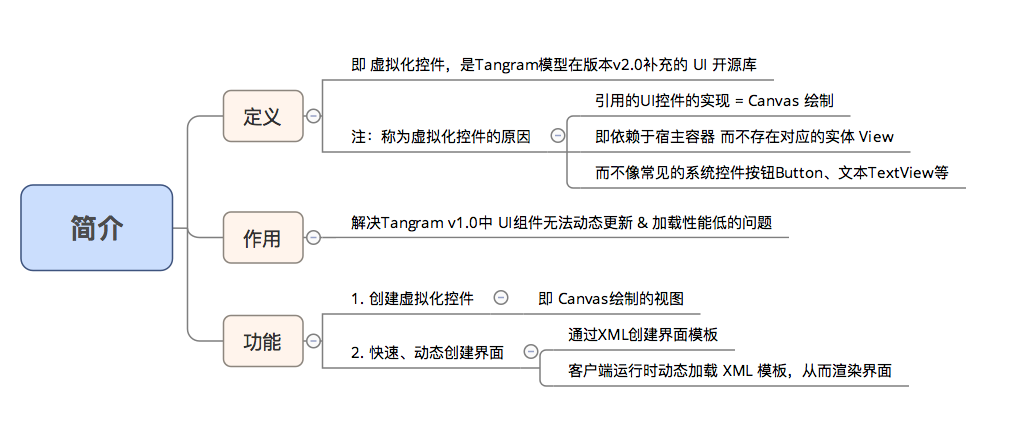 VirtualView简介
VirtualView的特点:
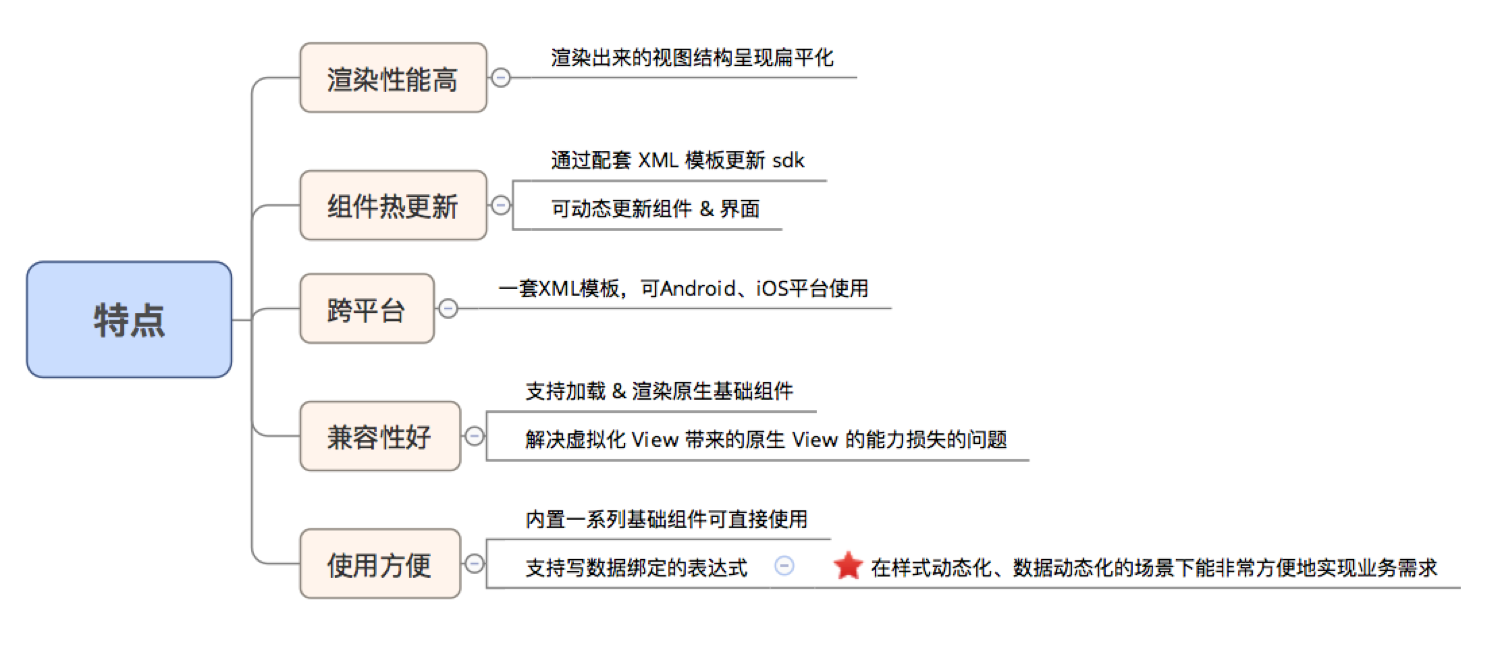 VirtualView特点
基布局描术文件是一个xml文件,并附带一个json数据文件:
描述布局文件示例:(其中的相关数据来源都可以从数据json文件中使用表达式获取)
 <RatioLayout
    orientation="H"
    layoutWidth="match_parent"
    layoutHeight="wrap_content"
    background="#f8f8f8">
    <VHLayout
        layoutRatio="1"
        orientation="V"
        layoutWidth="0"
        layoutHeight="match_parent"
        background="#f8f8f8">
        <VImage
            layoutWidth="match_parent"
            layoutHeight="120.5"
            scaleType="fit_xy"
            src="${picture_2}"/>
        <VLine
            layoutWidth="match_parent"
            layoutHeight="0.5"
            paintWidth="0.5"
            orientation="H"
            color="#e8ecef" />
        <VImage
            layoutWidth="match_parent"
            layoutHeight="60"
            scaleType="fit_xy"
            src="${picture_5}"/>
    </VHLayout>
    <VLine
        layoutWidth="0.5"
        layoutHeight="match_parent"
        paintWidth="0.5"
        orientation="V"
        color="#e8ecef" />
    <VHLayout
        layoutRatio="1"
        orientation="V"
        layoutWidth="0"
        layoutHeight="match_parent"
        background="#f8f8f8">
        <VImage
            layoutWidth="match_parent"
            layoutHeight="60"
            scaleType="fit_xy"
            src="${picture_3}"/>
        <VLine
            layoutWidth="match_parent"
            layoutHeight="0.5"
            paintWidth="0.5"
            orientation="H"
            color="#e8ecef" />
        <VImage
            layoutWidth="match_parent"
            layoutHeight="60"
            scaleType="fit_xy"
            src="${picture_4}"/>
        <VLine
            layoutWidth="match_parent"
            layoutHeight="0.5"
            paintWidth="0.5"
            orientation="H"
            color="#e8ecef" />
        <VImage
            layoutWidth="match_parent"
            layoutHeight="60"
            scaleType="fit_xy"
            src="${picture_6}"/>
    </VHLayout>
</RatioLayout>
数据json文件示例:
{
  "picture_2": "http://xxxx/images/59afb155c769f.png",
  "picture_3": "http://xxxx/images/59afb303042ca.png",
  "picture_4": "http://xxxx/images/59afb303042cb.png",
  "picture_5": "http://xxxx/images/59afb36cf1eb8.png",
  "picture_6": "http://xxxx/images/59afb303042cd.png"
}
xml文件需要经过编绎生成目标文件才可加载使用,如果用于项目中一般下发的都是经过编绎后的文件,也可以在客户端实时编绎。
一个xml就是一个组件,Tangram通过加载这个xml文件即可使用该xml文件所描术的组件,从而实现了动态新增组件类型的功能。
参考文献:
参考地址:http://blog.csdn.net/carson_ho/article/details/79358486
Tangram:http://blog.csdn.net/carson_ho/article/details/72123380
VirtualView:http://pingguohe.net/2018/01/09/a-taste-of-virtualview-android.html
http://tangram.pingguohe.net/docs/basic-concept/history


