005-React-Native子组件修改父组件的几种方式,兄弟
欢迎各位同学加入群:397885169,里面大神超多,会帮助解决各种问题。
本人提供 React-Native技术服务,坐标杭州余杭区文一西路智能小镇,限时周六周日,免费。
先来一个笑话<来自网络>:
客户被绑,蒙眼,惊问:“想干什么?”
对方不语,鞭笞之,客户求饶:“别打,要钱?”
又一鞭,“十万够不?”
又一鞭,“一百万?”
又一鞭。客户崩溃:“你们TMD到底要啥?”
“要什么?我帮你做项目,写代码的时候也很想知道你TMD到底想要啥!”
概念理解
-
基础知识:
   render() {
      return (
         <Parents-Component>
             <Children-Component>

                 <Children-Component>

                 </Children-Component>

             </Children-Component>

             <Children-Component>

             </Children-Component>
         </Parents-Component>
      );
  }
1-:在每一个render函数内,最外层的组件相当于Parents-Component,而包含内的组件相当于Children-Component。
2-:Children-Component内部还可以嵌套使用Children-Component,而相当于嵌套Children-Component来说,外一层的Children-Component就是它的Parents-Component。
3-:两个层级相同的Children-Component组件,称为兄弟组件。
DeviceEventEmitter可以跨组件,跨页面进行数据传递,还有一些状态的修改。
-
使用场景:
1-:父组件修改子组件
2-:子组件修改父组件
3-:兄弟组件相互修改属性 -
技术实现分析:
-1:父组件修改子组件:- 使用props
- DeviceEventEmitter
-2:子组件修改父组件
- 回调(callBack函数)
- DeviceEventEmitter
-3:兄弟组件相互修改属性
- DeviceEventEmitter
- 中间量。在父组件定义一个 state。组件A,使用props属性引入,操作组件A,修改页面内的state,然后,组件B,也是引入页面内的state,所以,当组件A状态变化时,修改页面的父组件state,重新render,然后,更新组件B,组件B进行render。
Coding
-
父组件修改子组件:
定义组件,使用从父组件传过来的props属性:export default class ParentToChildMsg extends Component { render() { return ( <View style={styles.container}> <Text>{this.props.name}</Text> </View> ); } } const styles = StyleSheet.create({ container: { justifyContent: 'center', alignItems:'center', padding:10, }, });
使用时:
    <ParentToChildMsg name="父组件通过props属性修改子组件属性"/>
    <ParentToChildMsg name={this.state.parentMsg}/>
-
子组件修改父组件
-
使用DeviceEventEmitter
  export default class PostMsgUseDevToPar extends Component {
      render() {
          return (
              <View style={styles.container}>
                  <TouchableOpacity onPress={this._postMsgByListener}>
                      <Text>使用DeviceEventEmitter修改父状态</Text>
                  </TouchableOpacity>
              </View>
          );
      }

      _postMsgByListener=()=>{
          DeviceEventEmitter.emit('Msg','此消息来自于子组件,父组件状态发生变化');
      }

  }
-
-
使用callBack回调函数,无参数返回:
export default class PostCallMsgToPar extends Component { render() { return ( <View style={styles.container}> <TouchableOpacity onPress={this.postMsgByCallBack}> <Text>使用Callback修改父状态,无返回值</Text> </TouchableOpacity> </View> ); } postMsgByCallBack=()=>{ if(this.props.onChangeMsg){ this.props.onChangeMsg(); } } } -
使用callBack回调函数,有参数返回:
export default class PostCallMsgToParAndMsg extends Component { render() { return ( <View style={styles.container}> <TouchableOpacity onPress={this._postMsgByCallBack}> <Text>使用Callback修改父状态,有返回值</Text> </TouchableOpacity> </View> ); } _postMsgByCallBack=()=>{ if(this.props.onChangeMsg){ this.props.onChangeMsg('使用Callback修改父状态,有返回值'); } } } -
兄弟组件属性修改
-
使用DeviceEventEmitter()
- ChildOneMsg发送消息给ChildTwoMsg,使ChildTwoMsg状态发生变化:export default class ChildOneMsg extends Component { render() { return ( <View style={styles.container}> <TouchableOpacity onPress={this.postMsgByListener}> <Text>使用DeviceEventEmitter修改兄弟组件状态</Text> </TouchableOpacity> </View> ); } postMsgByListener=()=>{ DeviceEventEmitter.emit('ChildOneMsg','send msg from ChildOneMsg to 兄弟组件'); } } - ChildTwoMsg接受来自ChildOneMsg的状态修改通知: export default class ChildTwoMsg extends Component { constructor(props){ super(props); this.state={ listenerMsg:'msg in ChildTwoMsg ', } } componentDidMount() { this.msgListener = DeviceEventEmitter.addListener('ChildOneMsg',(listenerMsg) => { this.setState({ listenerMsg:listenerMsg, }) }); } componentWillUnmount() { //此生命周期内,去掉监听 this.msgListener&&this.msgListener.remove(); } render() { return ( <View style={styles.container}> <Text>兄弟组件状态修改 使用DeviceEventEmitter:</Text> <Text>{this.state.listenerMsg}</Text> </View> ); } } - 在父组件中分别使用两个组件: render() { return ( <View style={styles.container}> <ChildOneMsg /> <ChildTwoMsg /> </View> ); } -
中间量
子组件修改父组件状态有好几种方式,次数,只演示使用callBack函数进行修改- 中间量 UseParStateOneComponent中的msg属性来自于父组件,执行_postMsgByCallBack函数后,先判断父组件是否msgByCallAndMsgToChild函数,存在则执行父组件函数。 export default class UseParStateOneComponent extends Component { render() { return ( <View style={styles.container}> <TouchableOpacity onPress={this._postMsgByCallBack}> <Text>{this.props.msg}</Text> </TouchableOpacity> </View> ); } _postMsgByCallBack=()=>{ if(this.props.msgByCallAndMsgToChild){ this.props.msgByCallAndMsgToChild('来自于UseParStateOneComponent修改父组件,进一步修改兄弟组件'); } } } - UseParStateTwoChangePage接收来自于父组件的props属性 export default class UseParStateTwoChangePage extends Component { render() { return ( <View style={styles.container}> <View style={styles.viewLine}/> <TouchableOpacity onPress={this._postMsgByCallBack}> <Text>{this.props.msg}</Text> </TouchableOpacity> </View> ); } } - 在父组件保存一个中间变量,childToChildMsg: export default class Msg extends Component { constructor(props){ super(props); this.state={ childToChildMsg:'此消息初始化,来自于父组件' } } render() { return ( <View style={styles.container}> <UseParStateOneComponent msg={this.state.childToChildMsg} msgByCallAndMsgToChild={ (msg)=> this.msgByCallAndMsgToChild(msg) }/> <UseParStateTwoChangePage msg={this.state.childToChildMsg}/> </View> ); } onMsgByCall=()=>{ this.setState({ callMsg:'通过CallBack修改父组件状态值' }) } msgByCallAndMsgToChild=(msg)=>{ this.setState({ childToChildMsg:msg }) } }
全部代码
import React, { Component } from 'react';
import {
AppRegistry,
StyleSheet,
Text,
View,
DeviceEventEmitter
} from 'react-native';
import PostMsgUseDevToPar from './PostMsgUseDevToPar'
import PostCallMsgToPar from './PostCallMsgToPar'
import PostCallMsgToParAndMsg from './PostCallMsgToParAndMsg'
import ParentToChildMsg from './ParentToChildMsg'
import ChildOneMsg from './ChildOneMsg'
import ChildTwoMsg from './ChildTwoMsg'
import UseParStateOneComponent from './UseParStateOneComponent'
import UseParStateTwoChangePage from './UseParStateTwoChangePage'
export default class Msg extends Component {
constructor(props){
super(props);
this.state={
listenerMsg:'listenerMsg',
callMsg:'callMsg',
callMsgAndMsg:'callMsgAndMsg',
parentMsg:'父组件通过props属性修改子组件属性,第二种方式:state-props',
childToChildMsg:'此消息初始化,来自于父组件'
}
}
componentDidMount() {
//注意addListener的key和emit的key保持一致
this.msgListener = DeviceEventEmitter.addListener('Msg',(listenerMsg) => {
this.setState({
listenerMsg:listenerMsg,
})
});
}
componentWillUnmount() {
//此生命周期内,去掉监听
this.msgListener&&this.msgListener.remove();
}
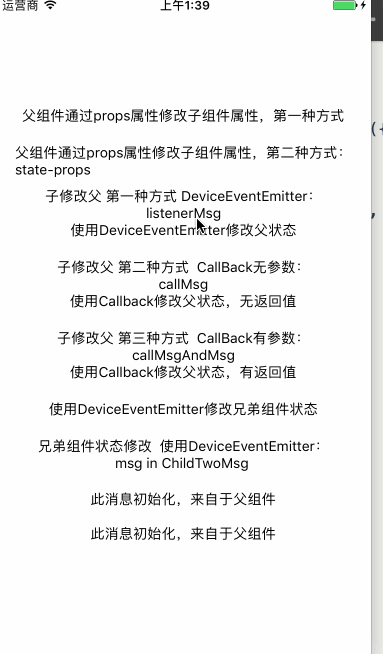
render() {
return (
<View style={styles.container}>
<ParentToChildMsg name="父组件通过props属性修改子组件属性,第一种方式"/>
<ParentToChildMsg name={this.state.parentMsg}/>
<Text>子修改父 第一种方式 DeviceEventEmitter:</Text>
<Text>{this.state.listenerMsg}</Text>
<PostMsgUseDevToPar />
<Text>子修改父 第二种方式 CallBack无参数:</Text>
<Text>{this.state.callMsg}</Text>
<PostCallMsgToPar onChangeMsg={
this.onMsgByCall
}/>
<Text>子修改父 第三种方式 CallBack有参数:</Text>
<Text>{this.state.callMsgAndMsg}</Text>
<PostCallMsgToParAndMsg onChangeMsg={(msg)=>{
this.onMsgByCallAndMsg(msg)
} }/>
<ChildOneMsg />
<ChildTwoMsg />
<UseParStateOneComponent msg={this.state.childToChildMsg} msgByCallAndMsgToChild={
(msg)=> this.msgByCallAndMsgToChild(msg)
}/>
<UseParStateTwoChangePage msg={this.state.childToChildMsg}/>
</View>
);
}
onMsgByCall=()=>{
this.setState({
callMsg:'通过CallBack修改父组件状态值'
})
}
onMsgByCallAndMsg=(msg)=>{
this.setState({
callMsgAndMsg:msg
})
}
msgByCallAndMsgToChild=(msg)=>{
this.setState({
childToChildMsg:msg
})
}
}
const styles = StyleSheet.create({
container: {
flex: 1,
justifyContent: 'center',
alignItems:'center',
},
});
运行效果截图
 msg.gif-140.3kB
关于DeviceEventEmitter一点点补充
DeviceEventEmitter可以用来跨组件,跨页面进行通信,使用方式非常简单。
在发出DeviceEventEmitter的页面或者组件中使用emit():
DeviceEventEmitter.emit('key',' values');
而在接收DeviceEventEmitter的页面或者组件中使用,需要分为两步:
- 第一步
    componentDidMount() {
        //注意addListener的key和emit的key保持一致
        this.msgListener = DeviceEventEmitter.addListener('key',(values) => {
            //todo....
        });

    }
-
第二步
 componentWillUnmount() {
     this.msgListener&&this.msgListener.remove();
 }
此处有炸弹,需要谨慎!!!!
假设有a b c 三个页面, a push> b push> c a发通知到c,此时c页面组件还未进行渲染。等渲染c时,c无法获取到a的通知,此时,c想要a的通知数据,只能正向传值。
DeviceEventEmitter只对同页面,或者页面内的子组件,或者页面内的子组件中的自组件有效,换句话说:只能针对已经加载的组件有。对于那些还未加载到的页面或者组件,使用addListener是无法获取到emit的值。最常见情况:在当前页面emit还未加载的页面进行数据变化,进入加载页面,addListener未生效。


