EFL UI Components
EFL
UI Components: Handling Elementary UI Component Libraries
(UI组件:处理Elementary UI组件类库)
如何定义一个应用?
- 从用户角度来说,一个应用是可由用户启动的一个进程.在这个进程中至少存在一个用于呈现内容于屏幕的window,然后用户可以通过一系列事件与之交互.
- 在计算机角度说,一个应用就是包括一系列用于响应事件和显示内容于屏幕的代码的合集.
the Elementary library通过一系列预制的UI组件来为用户与逻辑代码提供交互桥梁.比如可以提供大量图形用户界面的布局对象和组件.每一个Elementary应用程序至少含有一个window来为程序提供绘制内容的空间.
the Elementary library是一个简单的工具集.它提供了丰富的UI组件来组成程序的UI.UI组件可允许构建程序时不用重写这些基本对象,比如button.这些组件同样可以通过在用户产生交互时生成信号来传递与逻辑代码实现用户交互.
在基本组件中主要提供了3组基本对象:
- UI components:UI基本组件,用于构建应用UI
- UI containers: 用于为UI基本组件提供容器
- Infrastructure modules:为符合Tizen定制的一些模块
Using the Elementary Library in the Application
(在程序中使用基本库)
使用基本库的基本步骤:
- 使用
elm_init()函数初始化Elementary库 - 使用
elm_run()函数启动主循环
这个函数没有返回值,并且会周期性调用 - 添加组件至主循环
通常可以使用elm_<UI component name>_add()函数添加一个组件,并且其返回一个Evas对象(Evas_Object*).这个对象用于对组件进行设置. - 使用
elm_exit()停止主循环函数,并返回至main()函数 - 当应用终止时,使用
elm_shutdown()关闭基本库.
此函数会释放在主循环中简历的Elementary对象,所以无需的显示的释放所申请的空间.
下面的代码片段展示了在最基本的 Elementary application中的main()函数
#include <Elementary.h>
int
main(int argc, char **argv)
{
    elm_init(argc, argv);
    elm_run();
    elm_shutdown();

    return 0;
}
Handling Elementary Objects and Callbacks
(处理Elementary对象及回调函数)
所有UI组件都是Evas_Object*类型.因为在实现中Elementary对象中含有一个Evas对象,所以原则上可以对Elementary对象使用Evas和Elementary库的函数.但是,除非能明确使用目的,一般只使用Elementary的方法来操作Elementary对象.
Elementary 的UI组件基于分层的理念构建.它尽可能的将创建新组件时相似的代码分离出来.Elementary UI组件大量的继承UI容器组件和布局组件(一个包含了易于重写的标准Edje设计文件的容器组件)的代码.当在处理UI组件时,可以使用UI容器组件和布局组件的方法来操作Elementary对象,比如elm_object_part_content_set(), elm_object_part_content_get() 和 elm_object_part_content_unset().
由于Elementary UI组件会占用大量的内存,所以可以在需要大量组件时使用Elm_Object_Item 类型,比如 genlist 或者 gengrid 组件,来节省内存.通过使用Elm_Object_Item 类型,Elementary组件在理论上可以在包含大量对象时占用尽可能小的内存.效果也许不明显,但仍是有效果的.
Elementary 对象以及其底层的 Evas 对象 可以产生多种的事件.在对事件做出反应时吗可以通过以下步骤来注册回调函数:
- Evas event callback
在Evas 对象中,可以使用evas_object_event_callback_add()函数来为输入事件(例如key up ,key down ,mouse wheel) 产生回调函数.在一个Elementary 对象中,回调函数会在潜在的Evas对象上注册,而无不会将事件传递给上层对象. - Evas smart callback
使用evas_object_smart_callback_add()来为一个smart event添加回调函数.smart 回调只能在smart对象上调用,并且smart event也只能相应的smart对象注册.这种回调不会对输入事件做出回应 - Edje signal callback
edje_object_signal_callback_add()函数来为来自Edje 对象(theme 对象)发出的信号做出回调. - Elementary signal callback
elm_object_signal_callback_add()函数来为 Elementary UI组件的主题添加回调,且不会为输入事件做出回应 - Elementary event callback
elm_object_event_callback_add()为 Elementary 对象添加一个响应输入事件的回调函数.与 Evas event 回调不同的是,他根据层次可以将事件传递给父对象
在 Event Handling 章节中有更多关于 Elementary 对象的事件 内容.在 Graphical Objects 和 Evas Rendering Concept and Method章节中 有更多关于 Evas 对象与 smart对象的内容
Managing the Elementary Configuration
Elementary 的配置是有一系列预配置选项组成.这些配置将影响整个程序.
Elementary 配置文件可以存储以便在多种session中使用,一旦读取完成,Elementary 配置文件将会对应用进行相应设置.
处理Elementary 配置文件时应:
- 列出现存的配置文件:
Eina_List *list = elm_config_profile_list_get(); - 为应用设置指定的配置文件:
elm_config_profile_set("myprofile"); - 获取当前的配置文件:
char *profile = elm_config_profile_get(); - 重新载入配置文件:
elm_config_reload();
下面的代码时在base.src文件中的配置示例:
group "Elm_Config" struct {
   value "scale" double: 3.0;
   value "finger_size" int: 50;
   value "cache_flush_enable" uchar: 0;
   value "cache_flush_poll_interval" int: 512;
   value "font_cache" int: 512;
   value "image_cache" int: 4096;
   value "edje_cache" int: 32;
   value "edje_collection_cache" int: 64;
   value "glayer_long_tap_start_timeout" double: 0.5;
   value "glayer_double_tap_timeout" double: 0.33;
   value "thumbscroll_bounce_enable" uchar: 0;
   value "thumbscroll_bounce_friction" double: 0.5;
   value "longpress_timeout" double: 0.5;
   value "tooltip_delay" double: 1.0;
   value "password_show_last" uchar: 1;
   value "password_show_last_timeout" double: 2.0;
   value "engine" string: "software_x11";
   value "selection_clear_enable" uchar: 1;
   value "fps" double: 60.0;
}
在 customize themes, manage focus, and scale UI components. 中可以获取具体的设置
-
缓存配置:
- 使全局的配置缓存定时的清空(此例中为60s):
elm_config_cache_flush_enabled_set(EINA_TRUE); elm_config_cache_flush_interval_set(60);- 设置字体和图像缓存大小(分别为500,5000000字节):
elm_config_cache_font_cache_size_set(500); elm_config_cache_image_cache_size_set(5000000);- 设置 Edje 集合 和 Edje 文件缓存大小:
elm_config_cache_edje_file_cache_size_set(500); elm_config_cache_edje_collection_cache_size_set(500); -
手势操作层配置:
可以在gesture layer objects中设置长时间点击和双击所需的延迟时间,此例中设置延迟为500ms:elm_config_glayer_long_tap_start_timeout_set(0.5); elm_config_glayer_double_tap_timeout_set(0.5); -
滚动配置:
- 使滚动至界面边缘时有回弹效果:
elm_config_scroll_bounce_enabled_set(EINA_TRUE); - 控制回弹时的惯性:
elm_config_scroll_bounce_friction_set(0.5);
同样也可为页面滚动(包括动画,缩放动画)等添加惯性 - 可以通过
elm_config_scroll_thumbscroll_enabled_set()来使滚动条可以被拖拽.并且这里有多个拖拽的选项,比如摩擦系数,敏感度,加速度等.
下例设置了滚动条可以被拖拽以及每拖动1像素滚动条实际会滚动20像素.
elm_config_scroll_thumbscroll_enabled_set(EINA_TRUE); elm_config_scroll_thumbscroll_threshold_set(20); - 使滚动至界面边缘时有回弹效果:
-
长按事件配置:
先获取当前的长按出发延时,之后再修改它.下例+1s.double lp_timeout = elm_config_longpress_timeout_get(); elm_config_longpress_timeout_set(lp_timeout + 1.0); -
工具提示配置:
设置提示出现的延迟,下例设置为2s延迟:
elm_config_tooltip_delay_set(2.0); -
密码只显示最后一位的配置:
此配置可以允许用户在很短的时间内看见输入的最后一位密码.- 使密码显示功能生效:
elm_config_password_show_last_set(EINA_TRUE); - 设置显示的持续时间:
elm_config_password_show_last_timeout_set(5.0);
- 使密码显示功能生效:
-
设置 Elementry 引擎:
可以定义 Elmentry 渲染时所用的引擎.下面是支持的引擎列表:- "software_x11"
- "fb"
- "directfb"
- "software_16_x11"
- "software_8_x11"
- "xrender_x11"
- "opengl_x11"
- "software_gdi"
- "software_16_wince_gdi"
- "sdl"
- "software_16_sdl"
- "opengl_sdl"
- "buffer"
- "ews"
- "opengl_cocoa"
- "psl1ght"
elm_config_engine_set("opengl_x11"); -
激活存取模式(access mode):
通过激活存取模式,以便 Elementry 对象的信息可以在对象接受
EVAS_CALLBACK_MOUSE_IN事件时被读取 -
设置选择模式(selection mode):
当整个组件失去焦点时,清空选择器:
elm_config_selection_unfocused_clear_set(EINA_TRUE); -
启用画面镜像翻转:
Elementry 允许特定或者整个UI进行镜像翻转.如果启用镜像翻转,那么Elementry UI组件将会垂直镜像.当然其中的文本内容不会被镜像处理.
elm_config_mirrored_set(EINA_TRUE); -
设置帧数(frame rate):
为ecore_animator_frametime和edje_frametime定义FPS(the frames per second)值,例子中为PFS 60.
elm_config_fps_set(60.0);
Customizing Themes 定制主题
Elementry 使用 Edje 来为其 UI 组件提供主题. Edje 为一个应用中的每个组建提供了一个默认的主题. 可以通过 环境变量
ELM_THEME 来改变这个主题.也可以通过 Elementry Config API 来全区的配置这个主题.
为了定制 UI 组件,通过使用 Extensions 扩展的方式来为具体的 UI 组件制定风格.使用elm_theme_extension_add()来为 主题添加扩展,之后对组件应用一个新的风格 elm_object_style_set(). 一旦设置完成,这个扩展主题将会替代组件的默认主题.
Note:
当开发扩展主题时,为了考虑到信号的传递和具体的运作原理,应该了解 UI 组件是如何主题化的.如果在扩展时丢失了一些东西,将会影响UI组件的正确表达
在修改 Elementry 主题时也可使用覆盖的方式.覆盖的方式会取代默认的主题展现.Elementry 首先会检查覆盖的方式,之后在设置主题,最后应用扩展.可以通过 elm_theme_overlay_add() 和 elm_theme_overlay_del() 来增删覆盖主题.
Note:
当使用覆盖的方式时,可以替换每一个 UI 组件的默认视图和效果. 这与 设置全局主题非常相似,并且也容易与用户终端的选择
产生冲突.使用覆盖的方式也会更容易的在整个应用中产生样式不匹配的风险.所以除了特定的原因,尽量避免avoid使用覆盖的方式.
更过的样式定制,参考 Customizing Components 章节.
Managing Focus
当一个 Elementry 对象获取焦点时,输入事件将会直接传递至此对象.获取焦点的对象也通过修饰来向用户展示是哪里获取了焦点.在 Elementry 应用中,在同一时刻只有一个对象可以获取焦点.
为了将焦点转移至一个新的对象,可以使用 elm_object_focus_set().也可以使用elm_object_focus_allow_set() 来使对象失去焦点.
Note:
只有可见的对象才能获取焦点.
Elementry 支持使用焦点链以循环的方式使同一窗口下可获取焦点的对象获取焦点.通常,焦点链会在UI 组件添加至代码后定义.当然也可在需要时定制焦点链.
处理焦点的方法:
- 为了定义一个焦点链,首先应创建一个
Eina_List*对象,然后按照需要的顺序添加Elementry 对象,最后使用elm_object_focus_custom_chain_set()函数来设置父对象的焦点链来作为最后的列表.(在例子中container_object为父对象).
    Eina_List* list = NULL;

    list = eina_list_append(list, obj1);
    list = eina_list_append(list, obj4);
    list = eina_list_append(list, obj2);
    list = eina_list_append(list, obj3);

    elm_object_focus_custom_chain_set(container_object, list);
- 如需移除自定的焦点链而使用默认的,调用
elm_object_focus_custom_chain_unset()方法即可 - 如需显示的使循环继续,调用
elm_object_focus_custom_chain_unset()方法 - 高亮获得焦点的对象:
elm_config_focus_highlight_enabled_set(EINA_TRUE); - 启用焦点切换时的动画效果:
elm_config_focus_highlight_animate_set(EINA_TRUE);
更多的焦点相关信息参见 Managing Component Focus章节.
Scaling UI Components 缩放UI组件
通过 Elementry Config API 的设置.Elementry 提供了两种方式来缩放UI组件:
-
finger_size参数可使一些可交互的控件以更方便的操作性而进行缩放.
finger_size参数缩放控件是基于用户手指的尺寸.这在用户使用手指而非触控笔时尤为有用.手指尺寸的参数基于像素,并且设定了一块区域可判定为被手指击中的最小尺寸.
全局手指尺寸是由elm_config_finger_size_set()函数确定的.它调整尺寸以及可击中区域以方便用手指来操作.当前值可由elm_config_finger_size_get()获取.其中单位都为像素.
下例将当前全局手指尺寸增加了20像素:
Evas_Coord finger_size;
/* Get the current finger size /
finger_size = elm_config_finger_size_get();
/ Add 20px to finger size parameter and set it
to the global Elementary configuration*/
elm_config_finger_size_set(finger_size + 20);
```
-
scale参数则负责那些可见的UI组件(例如button,icon)以便在UI中更显眼.
scale参数只会缩放那些可视的UI组件,而那些固定像素的部分,比如高亮,阴影,纹理以及装饰等将不会发生变化
elm_config_scale_set()函数备用了设置全局的UI组件缩放倍数,而elm_object_scale_set()则会影响到指定的对象及其子对象.
Note:
缩放倍数是乘法叠加的,如果一个子控件也设置了缩放倍数,那么他会与父控件的倍数相乘.
下面的例子中,全局缩放为2.0倍,其中一个button缩放倍数也为2.0倍,故最后它呈现了4.0倍的缩放,其余子控件则为2.0倍.
Evas_Object *button;

/* Button object is created and configured */

/* Set the global scaling factor to 2.0 */
elm_config_scale_set(2.0);

/*
   Set the scaling factor of the button component to 2.0, this component
   appears 4 times bigger than its initial size
*/
elm_object_scale_set(button, 2.0);
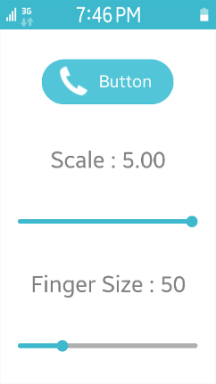
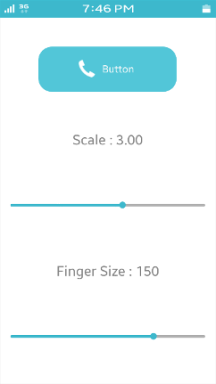
下图展示了finger size和scaling factor使如何影响UI的:
Figure: Scalability example
 Figure: Scalability example


- 第一个图片是示例程序的一个截图,通过拖拽,UI会直接显示缩放后的结果.
- 第二幅图展现了scaling factor从3.00增长至5.00时的效果.所有东西都变的更大,包括文字,以及那个滑块.
- 最后一幅图显示了当finger size从50 px增加到150px时的效果.只有最上面的button的面积增加了,方便了人们点击它.
Note:
具体哪些部分会缩放取决与theme(Edje file)中的scale参数.这有可能在开发新的Edje theme中需要考虑到.关于怎样在EDC中设置可缩放性的内容更多的在 Introduction to EDC Programming章节中.
Creating Scalable EDC Objects
为了使一个Edje对象具有可伸缩性,需将在parts中给scale参数赋值为1.
例子中呈现了一个由背景图片与一个显示内容的部分组成的最基本的button.其中2部分都设置为可伸缩.
group
{
   name: "button";
   images
   {
      image: "bg.png" COMP;
   }
   parts
   {
      part
      {
         name: "bg";
         type: IMAGE;
         scale: 1;
         description
         {
            state: "default" 0.0;
            image.normal: "bg.png";
         }
      }
      part
      {
         name: "elm.swallow.content";
         type: SWALLOW;
         scale: 1;
         description
         {
            state: "default" 0.0;
            visible: 0;
         }
         description
         {
            state: "visible" 0.0;
            visible: 1;
         }
      }
   }
}
当令一个对象具有可扩展性时,就应考虑到对对象中的图片会产生什么影响.这时你可以利用以下方式处理:
-
Image sets
如果应用可能会在不同的分辨率下运行,那使用Image sets可以为不同的分辨率提供不同的图片.在例子中,假设button已经定义过了,其中有2个不同的图片文件对应bg.png.修改image块,用一个名字为bg.png的image set来替代原来的单独的图片文件:- 在图片大小小于200px时使用
bg_low.png. - 在其余情况下使用'bg_high.png'
- 在图片大小小于200px时使用
images
{
set
{
name: "bg.png";
image
{
image: "bg_low.png" COMP;
size: 0 0 200 100;
}
image
{
image: "bg_high.png" COMP;
size: 201 101 5000 5000;
}
}
}
下面的图片展示了image set的使用效果.图中显示了3种按钮:
- 最上面的button大小是100x50像素,所以button的背景图使用`bg_low.png".
- 中间的button大小为200x100像素.这个图片时通过缩放得到的,所以渲染的效果不是很好,边缘很模糊.
- 最低下的图片使用`bg_high.png`.button的大小为201x101.效果比较好.
**Figure: Image set example**

- image borders
当一个被设置可伸缩后的button调整大小后,它的图像部分也同样会调整大小.当调整图像大小,而保持其边界时,使用`border`参数来指出不可调整的区域.
在`description`中为图片`bg`添加40px的左右边界,20px的上下边界:
```
parts
{
part
{
name: "bg";
type: IMAGE;
scale: 1;
description
{
state: "default" 0.0;
image.normal: "bg.png";
image.border: 40 40 20 20;
}
}
/* Other parts */
}
```
下图中在上方展示了原始button,底下的为改变大小后的button.当这个button改变大小后,其边界保持这最开始的比例,而只有最中间的部分改变了.
**Figure: Image border example**

>**Note**:
Except as noted, this content is licensed under [LGPLv2.1+](https://opensource.org/licenses/LGPL-2.1).

